So, the floor is tiled, the grouting is done, now what? That is the question I have asked in the past after completely what seemed to be the monumental task of installing a new floor. Something still didn’t look right. I had these gaps where my floor met carpet or some other type of flooring. Something about the way the tile butted right up next to the wall didn’t seem right either. That is when a friend told me about trim and transitions. Now I’m going to be your friend and pass on this invaluable information.
First off, we’ll cover transitions. Transitions are designed to make a smooth…wait for it…transition between different types of flooring. There are basically three types:
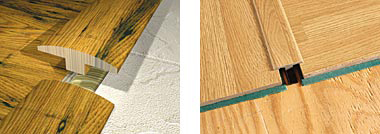
T-molding-T-molding is for joining two floors that are of the same height. This could be a tile floor to a different tile floor, or tile to a laminate floor of equal thickness. It is strictly for floors, so if you have twin children, it will not help you keep them together.
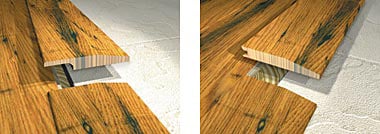
Reducer-This wonderful product is designed to create a smooth look between a floor of a higher height down to carpet, or some other surface that sits lower. Unfortunately, it is not designed melt away the pounds, although that would be nice.
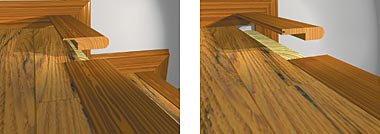
Stair Nose-No, it’s not just a playground taunt. It a transition designed to join your new flooring with a staircase. It comes in several varieties including pig, pug, ski-slope, and Caesar. That last part was a joke.
Okay, so now how about some trim? If you are really good, you can just cut the tile pieces along the wall edge so that they fit flush to the wall or leave a grout line equal to the other grout lines in the floor. I’m not that good, so I would typically add a base shoe of some type to the existing baseboard to cover those irregular cut edges. The most common base shoe is quarter-round, but in our home we took a fancier type of ceiling trim and used it as a base shoe. Maybe you want to try that. Another great alternative is removing the wooden baseboard and using some of the scrap tile pieces to make a matching tile baseboard to go with your project.
Necessity is the mother of invention, so depending on how many boo boos you made and how big they were, you may need to get creative with your trim and transitions to give it the smooth look you desire. There are lots of options out there, and you can also create your own. I have had to do that a few times, but the floors look great now…no seriously!
Copyright © 2010 FlooringSupplyShop.com


great info
very nice blog
thx
I like the way you have described all the things.It will help people like me a lot.Thanks for sharing such a great post with us.
Great blog love reading it
Thanks, that was helpful for people like me who are about to take the plunge into getting their house remodel!
I am not new to blogging and truly appreciate your site. There is much prime content that peaks my interest. I am going to bookmark your web site and keep checking you out.
This blog is great. How did you come up with this idea?