Satisfaction guaranteed. Call us anytime at 323-731-8453.
flooringsupply | Flooring Supply Shop Blog - Part 19

Installation of shower shelves – You could do it too

preformed niche, ready to tile niche, shower niche, shower recess, preformed recess, ready to tile recess, round shelf, divider shelf, recess-it, floating shelf

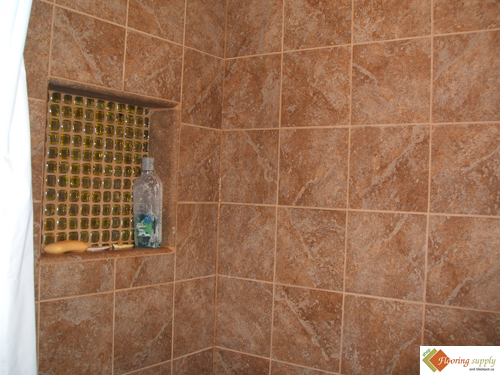
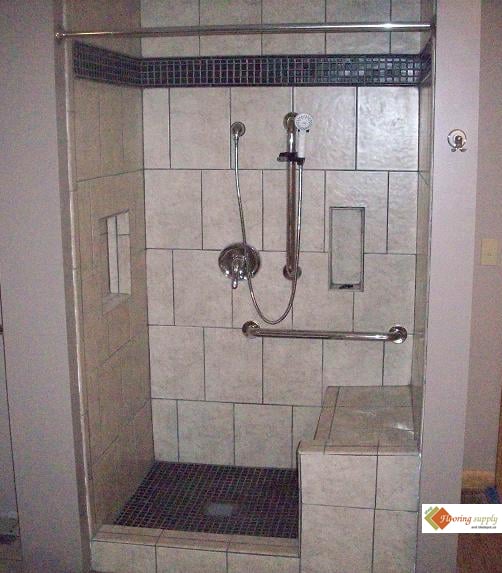
Have you ever thought how important are those little recessed shelves, in helping you have a perfect shower? Well, if not, let me tell you; a lot. What else makes it so easy to keep your soap, shampoo and other important toiletries within your arm’s reach while taking a shower and save yourself from all the discomfort of stepping out of the shower to get the necessary toiletry from the other corner of the bathroom? In a way shower recessed shelves help you take not just a shower but a ‘lazy shower’ so as to pamper yourself and relax your stressed nerves, right?

Now that you have conformed with my opinion, it’s time you also know that installing shower recessed shelves in your bathroom is no rocket science. If you ever need to add another recessed shelf in your shower cabinet, you can do it yourself; without waiting that extra hour for your plumber. How? Through ready to tile recessed shelves.

preformed niche, ready to tile niche, shower niche, shower recess, preformed recess, ready to tile recess, round shelf, divider shelf, recess-it, floating shelf

They have more than one feature which makes them a common man’s game. First, they are light, which means they do not demand a whole team, with you, to bring them from the store. And second, they are easy to install. Neither do they need framing prior to installation nor are they particular to the dryness or wetness of installing area. In addition they are easy to mount and are flexible with respect to being installed prior or after tiling. This means all that you have to do is mount them, place mortar mix (sand & cement), and tile as desired.

But do take care of the quality of the ready to tile shower recessed shelves. Low quality recessed shelves have cellulose or wood fibers and thus, are not water proof. They can rot and corrode and have a short life. One the other hand, high quality recessed shelves are made of corrosion resistant materials, with obviously, no hint of wood or cellulose. Once you fix them, you can rest assured to have long years of lazy showers with a contribution from these shelves by your side.

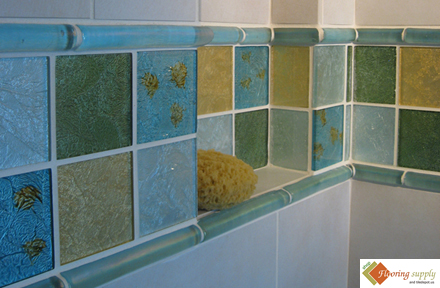
To help you in your lazy showers, there are another kind of shelves too-corner shower shelves. For many people, they come before the recessed shelves, in the choice for shower shelves. Fortunately, now they are available in the ready to tile form too. You can find them in all colors, designs and sizes at your nearby ready to tile bathroom fixtures store. But again, do take care of the quality. Given their constant exposure to water, they must be water resistant and corrosion free.

preformed niche, ready to tile niche, shower niche, shower recess, preformed recess, ready to tile recess, round shelf, divider shelf, recess-it, floating shelf

Well, if you do not have enough time to visit the store in your locality, don’t worry. You can still get your favorite kind of shower shelf. You do spend a certain amount of time on the Internet, right? Well then check out our collection and place your order, log on to www.flooringsupplyshop.com

Copyright © 2010 FlooringSupplyShop.com

Cheetah Pads Free Training Class new Dates

Cheetah Pad, Eco Friendly Stone Polishing, EcoPads, EcoStone, earth day, eco stone, Eco-friendly, energy conservation, Environmentally friendly flooring

Free 8 hours training class event

Cheetah Pads Are Being Hailed As

“The Most Important Breakthrough For Stone Restoration In 20 Years”

Hurry, Act Now! Space is extremely limited!

It’s a No-Brainier!

GET ONE FULL-DAY OF HANDS-ON STONE RESTORATION TRAINING

ABSOLUTELY FREE!!!

Simply buy one set of 17″ or 20″ Cheetah Pads and we will spend 8 hours teaching you how to MAXIMIZE RESULTS AND PRODUCTIVITY by utilizing the fastest, most innovative, eco-friendly stone restoration system on the planet!

Get all the tips first hand from the inventor and mad-scientist himself, Dana Kothrade! Learn how to save time, save money, and go green! No boring power-points and lengthy classroom lectures!

Hurry, Act Now! Space is extremely limited, Free training class event to be held on NOVEMBER 4th and DECEMBER 9th!!!

FREE Lunch!

FREE Training Manual!

Cheetah Pad, Eco Friendly Stone Polishing, EcoPads, EcoStone, earth day, eco stone, Eco-friendly, energy conservation, Environmentally friendly flooring

Cheetah Pad, Eco Friendly Stone Polishing, EcoPads, EcoStone, earth day, eco stone, Eco-friendly, energy conservation, Environmentally friendly flooring

Top 5 Reasons Why You Should Try Cheetah Pads:

1. Cheetah Pads can reduce your labor costs by as much as 70%

2. Lower your material cost by up to 75% using Cheetah pads and water only! No expensive diamond disks or crystallizers ever needed!

3. 100% eco-friendly! With the Cheetah Pads you never have to worry about using any harsh chemicals around children, pets, and even yourself!

4. Achieve results better than factory finish in half the time!

5. Cheetah Pads make stone restoration easier than ever before. If you can count to 4 you can polish a floor!

GET YOUR SET TODAY!

Stone Restoration without 20 Years of Experience

The Fastest Stone Restoration System On The Planet!!!

Diamond Pads That Perform Stone Restoration in Half The Time

  • Very easy To Use
  • Up to 70% reduction in labor
  • As much as 75% lower cost
  • Work well on any floor buffer, orbital or planetary machine
  • No heavy duty equipment required
  • Extremely fast cutting
  • No chemicals used, only water
  • No acidic components
  • Extreme concentration of micro abrasives
  • Works incredibly well on ALL Marbles, Travertine, Limestone, Terrazzo and Polished Concrete
  • Chemical free Diamond pads are an Eco Friendly way to achieve a dull hone on Travertine, Marble, or Limestone Floors, countertops or walls.
  • Use on floors walls or countertops with little to no lippage (uneven tiles).
  • Pads remove wear and provide a variety of appearance levels from dull hone (no shine) to highly polished.
  • Safe on all stones and tile, will not damage any stone
  • Professional strength formula.

Environmentally Friendly

Cheetah Pad, Eco Friendly Stone Polishing, EcoPads, EcoStone, earth day, eco stone, Eco-friendly, energy conservation, Environmentally friendly flooring

Made in the U.S.A

Buy now

Eco Friendly Stone Polishing Pads Video’s

Maintain Concrete Pavers and Brick

How To Seal & Maintain Concrete Interlocking Pavers & Brick

glaze n seal, Pavers sealers, Brick sealers, sure seal Sealant, stone solution sealers, tile and grout sealers, Stone Color Enhancer, Stone Sealant Impregnator

Buy Now

The following information is based on product application reports and manufactures information and is provided in good faith to assist the consumer. READ ALL INSTRUCTIONS AND PRODUCT LABELS COMPLETELY BEFORE USING. PRE-TEST IN AN INCONSPICUOUS AREA PRIOR TO APPLICATION TO DETERMINE IF THE DESIRED RESULTS ARE ACHIEVED.

Unsealed interlocking pavers & brick are subject to staining, fading, sand loss, and can sometimes develop weeds and mildew growth. With proper sealing and maintenance your pavers will be more likely to have a long lasting, beautiful and durable life and appearance. The sealer selection for Interlocking Pavers, brick and other types of sand set pavement material is generally based on the desired “finished” look and the degree of stain resistance required as well as the need for joint sand stabilization. Most paver installations will benefit from a sealer that has joint sand stabilizing properties. Use of Glaze ‘N Seal’s Paver Sealer & Joint Stabilizer will protect from stains, oil and fading as well as sand erosion.

Recommended Product Stain Resistance Finished Look Comment
Paver Sealer/Stabilizer Excellent Low-Medium Sheen Water-based – Film-forming

Surface Preparation

Newly manufactured concrete pavers should cure 14 days or more before sealing. Follow paver manufacturer’s recommendations. Prior to the application of Glaze ‘N Seal’s sealer products, surface must be thoroughly clean. Remove all dirt, oil, grease, paint, efflorescence and any previous sealers that may not be compatible with the new sealer. General cleaning may be done using Glaze ‘N Seal’s alkaline base Heavy Duty Cleaner. Mix the concentrated detergent according to label instruction depending on severity of surface soils. For Efflorescence stains or hard water deposits, use Glaze ‘N Seal’s mild acidic cleaner Efflorescence Remover. Note…(When acid has been used for any reason, surface must be neutralized). For neutralizing, we recommend Glaze ‘N Seal’s Neutralizing Rinse. Always read cleaning product instructions and cautions with any cleaner.

After tamping down joint sand and sweeping the sanded areas for new installations, be sure the sand is at least 1/8 inch below the surface of the pavers. Make sure all sand residue and fine powder is removed with broom & blower before application of any film forming sealers. Allow any moisture in or on the surface of the pavers to dry at least 24 hours. Allow 48 hours or more if temperatures are cool or a pressure washer has been used. For best results the sand should be dry to its full depth before sealing. It is always recommended to test the sealer of choice in a small area first. Always read product label and directions carefully before beginning to use any sealer products.

Seal

  • Apply Glaze ‘N Seal’s Paver Sealer & Joint Stabilizer to a clean dry surface using a compressed air hand pump garden-type sprayer. Apply a heavy saturating coat of sealer. Ensure that all joints are flooded to maximize sealer soaking into the dry sand. Immediately squeegee any excess product down into the sand joints using a large foam or rubber squeegee. Avoid puddling on the surface. An optional second thin coat may be applied to the surface of the pavers after two hours if desired to increase protection & gloss. Ideal surface temperatures should be above 55° and below 85°.
  • After final coat, allow sealer to dry 2 hrs before foot traffic. Limit heavy traffic. Keep vehicular traffic and moisture off for 72 hours while sealer cure

Maintenance & Other Sealer Options For Concrete Interlocking Pavers & Brick

Seal

  • Maintain your pavers with periodic cleaning of grease, dirt, loose soil and hard-water stains with Glaze N Seal’s (Heavy Duty Cleaner). For stubborn grease spots use Heavy Duty Cleaner in a more concentrated formulation. Rinse surface well with water.
  • Reapply maintenance coats of sealer as needed. All Glaze N Seal sealers are re-coatable. Make sure surface is clean and dry at time of reapplication.

If Considering Other Glaze ‘N Seal Sealers For Concrete Interlocking Pavers & Brick, See Options Recommended From Chart Below

Finished Look Stain Resistance Recommended Product Comment
“Wet Look” Excellent-S, O, W “Wet Look Lacquer” Solvent-based – Film-forming
Low-Medium Sheen Excellent-S, O, W Multi-Purpose Sealer* Solvent-based – Film-forming
“Natural Look” Excellent-S, O, W Stone Sealant Impregnator Water-based – Penetrating
“Natural Look” Excellent-W Natural Look Penetrating Sealer* Water-based – Penetrating

Stain Resistance: Stain (S ) Oil (O) Water (W)

*Economical water repellant. If a natural look with oil resistance is needed, use Stone Sealant Impregnator.

  • If a deeper wet look appearance is desired, Glaze ‘N Seal’s “Wet Look” Lacquer can be applied to an unsealed surface, When applying film-forming sealers as “Wet Look” Lacquer or Multi Purpose sealer, use 2-3 thin even coats. Minimize foaming. A solvent resistant spray applicator is recommend when applying “Wet Look” Lacquer“.
  • Glaze N Seal’s Natural Look Penetrating Sealer may be used to provide a long lasting water protection that looks natural on the paver surface. Glaze ’N Seal’s Stone Sealant Impregnator will provide premium stain, oil and water protection that looks natural on the surface. When using penetrating-type sealers Stone Sealant Impregnator or Natural Look Penetrating Sealer, apply one liberal coat using a sprayer or roller. Do not allow excess Natural Look Penetrating Sealer to dry on the surface. Wipe up excess sealer before it dries. After 10-24 hrs check repellent by dropping water droplets on surface to check for water bead. If need apply second coat.

More information on how to clean Seal and maintenance your hard surface

How to Seal and Maintain Concrete Counter Tops

How to Seal and Maintain Concrete Counter Tops

Miracle Sealants, sure seal Sealant, stone solution sealers, Glaze n Seal, Slip Grip, tile and grout sealers, Stone Color Enhancer, Stone Sealant Impregnator, Grout Sealer

Buy Now

Recommended Sealers for Use on Concrete Counters

The following Glaze ‘N Seal sealers are popular choices for use on concrete counters. They will resist water stains, oil stains and enhance appearance. They are durable and re-coatable. Always perform a test patch, allow it to dry thoroughly and “test” likely contaminates.

Wet Look Lacquer

  • A clear coating sealer (solvent base)
  • Non-Yellowing
  • Will not turn white
  • Excellent oil resistance
  • Resists acids
  • Resists efflorescence (white residue)
  • Imparts “wet look” appearance
  • Additional coats add gloss
  • Safe for food surfaces (after fully curing)
  • Re-coatable
  • Leaves a coating on top of surface

Multi-Purpose Sealer

  • A clear coating sealer (water base)
  • Leaves a coating on top of surface
  • Non-Yellowing
  • Resists acids
  • Excellent oil resistance
  • Safe for food surfaces (after fully curing)
  • Re-coatable
  • May be applied over Wet Look Lacquer
  • Medium to high sheen (based on number of coats)

Stone Sealant Impregnator

  • A below surface penetrating sealer (water base)
  • Leaves no film or coating on top
  • Natural look appearance
  • Safe for all food surfaces
  • Excellent oil resistance
  • NOT acid resistant
  • May be re-applied if needed
  • Not recommended over coating-type sealer

New concrete counters should cure at least seven (7) days or more before sealing. Read package label carefully and perform a small test-patch before sealing entire surface. Concrete surface must be clean, dry and free of any contaminants including old wax and failing sealers. Wax or polish should be stripped with a quality item such as Glaze ‘N Seal Stone Stripper or Heavy Duty Cleaner. Old coating-type sealers (if peeling or damaged) should be removed with a quality item such as Glaze ‘N Seal Paint, Sealer and Coating Stripper.

Estimated coverage per gallon for the first coat – 150 to 200 square feet. Additional coats will add fifty-percent more coverage.

Coating-type sealers will build protection and gloss with multiple, thin and even coats. Use a lambs-wool applicator, brush or paint pad. Apply additional coats until the last coat does not darken the appearance.

Penetrating-type sealers will not add gloss but will protect. Apply two liberal coats with a brush or paint pad. Generally, additional coats will not affect appearance, but may leave a residue if over applied.

Routine Maintenance

Even AFTER sealing, the concrete counters are not indestructible.

Use coasters for glasses and hot pads for hot items. Minor scratches should be removed with non-abrasive “Scotch Brite” pad.

Do not place hot pans and dishes (above 300°) on sealed surface.

Stain resistance to water-based spills, oils, food items, etc., is excellent; however, spills should be removed as soon as possible.

Coating-type sealers will be etch-resistant to acidic items such as colas, citrus juices and wine because of the film barrier. Penetrating sealers do not protect against etching.

Clean the sealed surface regularly with a soft cloth using diluted Glaze ‘N Seal Neutral Cleaner or Stone Cleaner. Rinse with a minimum of water and dry promptly. Soaps and detergents can leave a film on the surface. NEVER use abrasive cleaners, bleach or ammonia.

The use of Glaze ‘N Seal’s Acrylic Floor Polish or a quality paste Carnauba food safe wax is optional as a sacrificial maintenance top coat…. Not a silicone type product.

Reapply polish as needed (remove any old polish or wax first) before reapplying sealer.

Note: Always test a small area of surface to be sealed to verify penetration and satisfaction of sealed appearance.

More information on how to clean Seal and maintenance your hard surface

Floating Floor the Preferred Choice

ceramic tiles, Hardwood floor. Laminate flooring, stone, marble, granite, travertine

Flooring can enhance the aesthetic appeal of your house, provided it is appropriately installed. Right installation of the flooring is as important as choosing the right flooring material. Nowadays, people are increasingly opting for floating floor. Floating floor, a misnomer, is actually a floor installation method, which is wrongly confused by many as a type of flooring material. In floating floor, the flooring material generally consists of planks, which are installed without being glued, stapled, or nailed to the subfloor. Instead, of being fastened to the subfloor, the planks are joined to one another; allowing the floor to ‘float’ over the surface underneath.

Homeowners can choose amongst the different types of floating floors; such as the ‘glue together’, which is an older version of floating floor. The glue together floating floor is assembled with the help of appropriate adhesive and pressure applied on the planks, to bind it together. Another version of floating floor is the ‘click together’, which is also referred to as ‘enter click’ or ‘tongue and groove’. In this, the edges of the planks are so designed that these easily click together, when combined and tapped on the edge toward one another. This does not require the use of any adhesive, making installation hassle-free and time-saving. The latest as well as the fastest floating floor option is the ‘lock and fold’ system, which requires neither tapping of the planks nor sticking them with glue. In this type of floating system, the planks are attached with the help of a special milled interlocking system.

ceramic tiles, Hardwood floor. Laminate flooring, stone, marble, granite, travertine

The rising popularity of the floating floor is due to the various benefits it offers. The biggest advantage of choosing floating floor is that it is convenient and hassle-free, which saves both effort and time. This installation method is so easy that the flooring of the room can be completed in just a few hours; irrespective of whether the installer is amateur or experienced. In addition, the floating floor is available in a wide range of material, such as hardwood, linoleum, bamboo, cork and plastic laminate. Depending upon their preferences and budget, homeowners can choose amongst any of the available options.

Floating floor is an ideal choice for areas with high humidity or moisture problem. Most of the flooring options are affected by fluctuations in moisture and humidity. Wooden planks, for example, tend to contract when humidity is low and expand when humidity is high; thereby causing gaps and buckling, respectively. In contrast, since the floating floor is not fastened to the underlying surface, it contracts and expands as one complete unit without giving rise to gaps or buckling. Besides, spacers are left alongside the walls to allow for expansion.

ceramic tiles, Hardwood floor. Laminate flooring, stone, marble, granite, travertine

As floating floor is generally available as planks, homeowners only need to replace the damaged ones, rather than change the whole flooring. As a result, homeowners tend to save significant amount of money. Additionally, it is less expensive than most of the other flooring choices.

Owing to all these benefits, floating floor has become a preferred choice of more and more homeowners.

Copyright © 2010 FlooringSupplyShop.com

flooringsupply | Flooring Supply Shop Blog - Part 19