www.flooringsupplyshop.com Flooring Supply Store


LoudMouth Operating Instructions

By SunTouch® A division of Watts Water Technologies, Inc.

Made in the U.S.A

Ensure A Quality Installation with the NEW LoudMouth.

Heated floor mat, heat mat, radiant floor heat mat, radiant floor heating supply, radiant floor heating mat, radiant floor mat, flooring heating System, tile heating,

PREPARATION

Heated floor mat, heat mat, radiant floor heat mat, radiant floor heating supply, radiant floor heating mat, radiant floor mat, flooring heating System, tile heating,

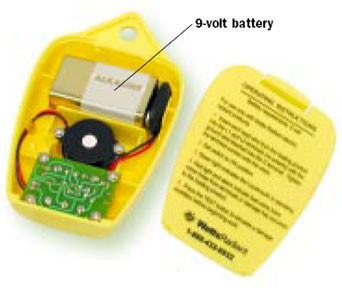
1. Open the battery compartment cover and connect the 9-volt battery included.

2. Replace the battery compartment cover and switch the unit “ON”.

3. The alarm should sound and the red light should be lit when there are no connections to a mat or cable. If these things do not occur, inspect the battery connection or replace the battery.

4. During normal use, the green light indicates that the LoudMouth is monitoring the mat or cable for damage. Should the green light go out, replace the battery before continuing work.

LoudMout, Heated floor mat, heat mat, radiant floor heat mat, radiant floor heating supply, radiant floor heating mat, radiant floor mat, flooring heating System, tile heating,floor heat cable, radiant flooring, radiant floor heat system, floor warming system, heated floor system, under floor heat

OPERATION

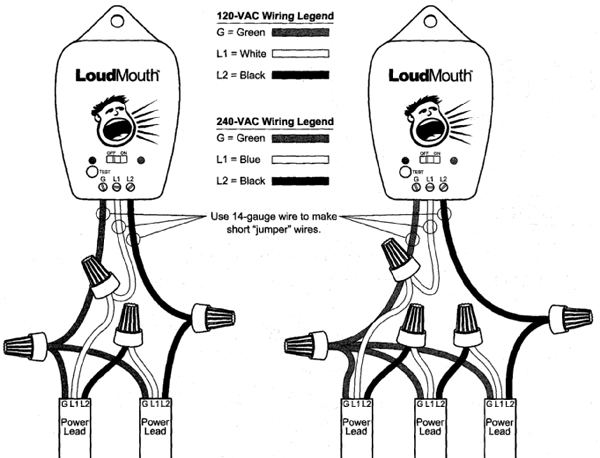
1. FOR A SINGLE MAT OR CABLE: Insert each lead wire from the mat or cable into the L1 and L2 terminals (no polarity) with the ground wire inserted into the G terminal. Tighten the terminal screws onto the wires.

FOR UP TO THREE MATS OR CABLES: Connect one non-green lead wire from one mat or cable into the L1 terminal. Connect one non-green lead wire from a DIFFERENT mat or cable into the L2 terminal. Now connect the remaining lead wires so that the mats or cables are in “series” with one another. If this is not done properly, the LoudMouth may not correctly monitor the mats. Lastly, connect all ground wires from the mats or cables together to the G terminal using a jumper wire. See schematics on reverse side for proper connection to the LoudMouth.
2. Set the switch to the “ON” position.
3. A green light indicates the LoudMouth is operating.
4. Hang or place the LoudMouth where it can be seen and heard during heating product installation.
5. A red light and alarm indicate lead wires have come loose from terminals or damage has occurred to the heating product.
6. Press the TEST button to simulate a damage condition before beginning work and anytime during installation if desired to confirm LoudMouth operation.

Heated floor mat, heat mat, radiant floor heat mat, radiant floor heating supply, radiant floor heating mat, radiant floor mat, flooring heating System, tile heating,

Replace the battery compartment cover and switch the unit “ON”.

LoudMout, Heated floor mat, heat mat, radiant floor heat mat, radiant floor heating supply, radiant floor heating mat, radiant floor mat, flooring heating System, tile heating,floor heat cable, radiant flooring, radiant floor heat system, floor warming system, heated floor system, under floor heat

Connect the leads to the LoudMouth

LoudMout, Heated floor mat, heat mat, radiant floor heat mat, radiant floor heating supply, radiant floor heating mat, radiant floor mat, flooring heating System, tile heating,floor heat cable, radiant flooring, radiant floor heat system, floor warming system, heated floor system, under floor heat

Swicth the unit “ON”. The green light should be lit


LoudMout, Heated floor mat, heat mat, radiant floor heat mat, radiant floor heating supply, radiant floor heating mat, radiant floor mat, flooring heating System, tile heating,floor heat cable, radiant flooring, radiant floor heat system, floor warming system, heated floor system, under floor heat

Refer to the heating product Installation Manual for detailed installation instruction.
Contact us at contact@flooringsupplyshop.com. if damage or problems occur..

Heated floor mat, heat mat, radiant floor heat mat, radiant floor heating supply, radiant floor heating mat, radiant floor mat, flooring heating System, tile heating,
www.suntouch.com

Click here for SunTouch VIDEO Library

SunTouch EMF vs. Product A - SunTouch EMF vs. Product B

SunTouch Floor Heating Mat Links
SunTouch Mats Specifications and installation procedure - UnderFloor Specification - Mats Installation and Spec

SunTouch Floor Heating Spool Links
WarmWire Order Instruction - WarmWire Strap - WarmWire Installation Guidelines

Heating Controls Links
Programmable SunStat Spec - Owner's Manual Programmable SunStat - Owner's Manual Non-Programmable - Non-Programmable SunStat Spec

Misc SunTouch Links
25 Years Warranty - Loudmouth Monitor - EMF - Frequently Asked Questions - Repair Heating Wire - Low price Guarantee Policy


This page was created by FlooringSupplyShop you may view it for personal use only,
and for flooringsupplyshop.com customers only. DO NOT copy for commercial use. copyright material of www.flooringsupplyshop.com & International Flooring Center, inc.