Items You Will Need
Heating Cable Repair Kit
This Heating Cable Repair Kit contains components for 1 location repair.
Certain components may not be used depending on the method of repair selected.
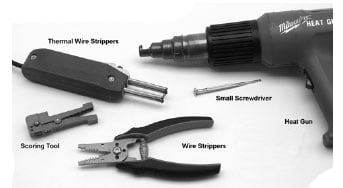
Electrical Repair Tools
Heat Gun:
• Must be able to heat about 1000°F.
• Milwaukee model 8975.
Thermal Wire Strippers:
• For stripping the heating wires.
• Omega model TW-1.
Scoring Tool:
• For cable with an outside jacket.
• Ideal model 45-403 with blade part K-6502.
Wire Strippers:
• For cutting and stripping 16AWG wire.
• GB model GESP-55.
Small Screwdriver:
• For helping separate heating wire from braid.
• Paper clip or similar pointed tool may also be used
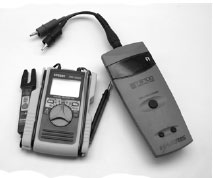
Electrical Test Tools
Digital Multi meter:
• Must measure up to 20,000 ohms. • A.W. Sperry model DM-2000.
TDR Meter (Time Domain Reflectometry):
• For diagnostic testing if additional damage is detected.
• Harris Corp. model TS-90 or TS-100 “Cable Fault Finder”.
Other Tools
Hammer and chisel:
• For removal of tile and mortar if needed, for creating a valley to lay the splice into.
Hot glue gun with standard stick adhesive:
• For attaching splice into the “valley” in floor.
Scissors
GETTING STARTED
A1 Make sure the power is turned OFF!
A2 Two repair methods are shown. Choose the method that is best for your installation:
DIRECT SPLICE – This method is used when the damaged cable has enough “play” to be cut and overlapped by about 3/4-inch.
This also gives the best possible heating uniformity over the splice versus using the Jumper Splice.
JUMPER SPLICE – This method is used when the damaged cable does not have enough “play” to be cut and overlapped.
This also results in a splice section that will have very little heating directly over the splice.
A3 Depending on your installation, the heating cable is constructed in one of the two following ways:
Jacketed Heating Cable:
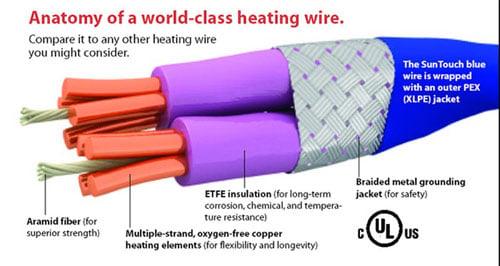
Two insulated heating wires, covered by a tin-coated copper braid, covered by an outer covering.
Each heating wire consists of 3 or 4 small heating elements that are important to keep intact and undamaged.
Normally the number of elements corresponds to the wire insulation color as follows:
Black 4 – Brown 4
White 4 – Yellow 4
Red 3 – Clear 4
Green 4 – Tan 4
Orange 3 – Violet 4
Blue 3 – Gray 4
Stainless Steel Heating Cable:
Two insulated heating wires, covered by a stainless steel braid.
Each wire consists of 3 small heating elements that are important to keep intact and undamaged.
TILE AND MORTAR REMOVAL
If you have not done so already, remove the tile/stone/marble floor covering over the damaged cable area very carefully.
Removal of the grout around the affected tile(s) must be done with blunt instrument such as a hand-held grout-removal tool.
DO NOT USE A KNIFE!
Then gently break out the tile with a small hammer, cleaning up the pieces as you go.
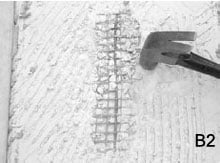
Remove enough mortar and tile to give about 4 to 5 inches of free wire on both sides of the damage to work with.
Often part of the wire may be seen so that the mortar may be removed carefully around the damaged wire using the hammer and/or chisel. Mesh can be cut with scissors to free the wire.
INSTALLING THE REPAIR
If you elect to do the Jumper Splice (see Step A2), please skip to Step D1
Direct Splice
Cut out the damaged wire location, creating two ends, or leads.
If you do not have the Jacketed Heating Cable, SKIP to Step C6
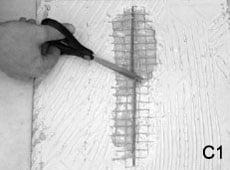
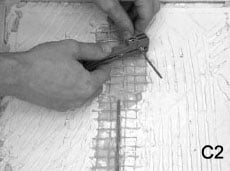
Use the Scoring Tool to carefully score the jacket at about 2″ from the end of each lead.
Do this by placing the Cable lead into the v-notch of the tool, and rotate the tool only 1 or 2 revolutions around the Cable.
Do not place any additional pressure on the tool head to cut deeper. Let the tool apply its own spring-loaded pressure.
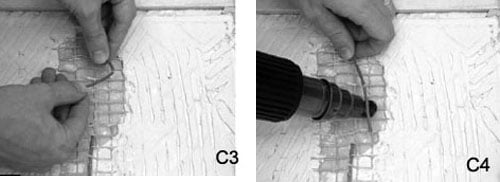
C3 Bend the Cable to snap the jacket slug completely loose at the score.
C4 Use the Heat Gun (set to HI temperature, about 1000F) and move it back and forth under the jacket slug for about 3-4 seconds until you see it start to loosen, slightly shrinking at the ends.
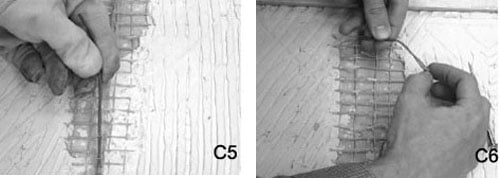
C5 Use a glove or other protective cloth to pull off the loosened jacket slug. Do not touch the hot jacket slug with your fingers. It will burn!
C6 Loosen the braid by pushing back on the braid about 1/4″, causing the ends of the heating wires to be exposed.
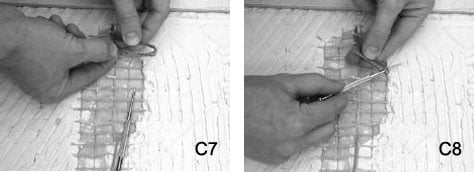
C7 Bend the Cable back on itself.
C8 Use the Small Screwdriver, fingernail, or similar blunt instrument to pry carefully between the braid, making an opening to pull the heating wires through. Pull each wire through the braid.
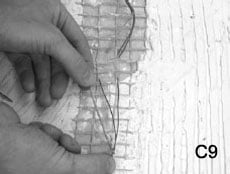
C9 Pull the braid tight to make it into a pigtail.
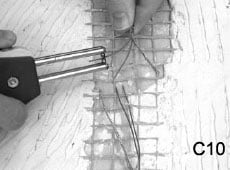
C10 Use the Thermal Wire Strippers to carefully strip off exactly 1/2″ of the insulation from the heating wires.
Count the little heating elements to make sure you did not cut off any, resulting in a hot spot and possible failure.
You will also find a strand of fiber with the heating elements.
You do not need to separate or remove this fiber.
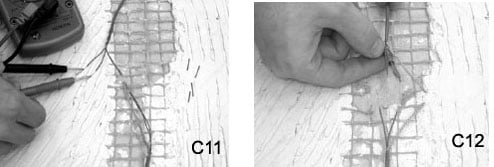
C11 Use the Digital Multi meter and TDR at this repair location before proceeding. Check for any additional damage locations in the heating cable by “looking” in both directions. If you need
C12 Slide a Solder Tube over one of the heating wires
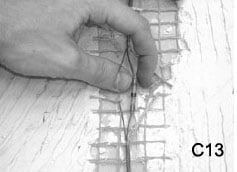
C13 Pull the heating wires together to overlap the heating elements of both leads. Lightly twist the elements together to better join them. Slide the Solder Tube over the twisted elements, centering them between the gray adhesive bands. If this is not done correctly, the elements may pull out and cause splice failure.
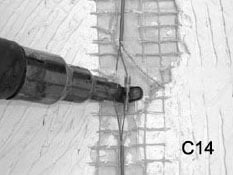 C14 Use the Heat Gun (set to HI temperature, about 1000F) to carefully heat the Solder Tube. Heat directly under the solder ring in the middle first.
IMPORTANT! When the solder completely melts and flows into the wires, continue heating for another 3 seconds. If you stop too soon, an incomplete solder connection will result, causing connection failure later.
When the solder is completely melted, begin moving the Heat Gun back and forth under the rest of the Solder Tube to shrink the tube and cause the adhesive bands at the ends to melt and flow onto the wire insulation.
After the tube is completely shrunk and the adhesive bands are fully melted, stop heating the tube. Additional heating will not help and may cause scorching of the tube or failure. Allow the Solder Tube to cool for about 1 minute.
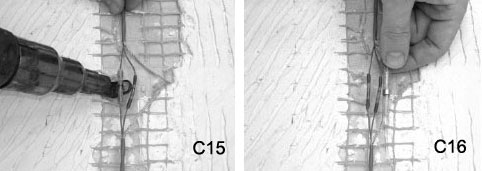
C15 REPEAT Steps C12 through 14 for the other heating wire.
C16 Slide a Ground Solder Tube over a ground braid lead. Overlap the braid ends and twist them to help hold them together. Slide the Ground Solder Tube over the twisted braid ends, centering them under the ring of solder.
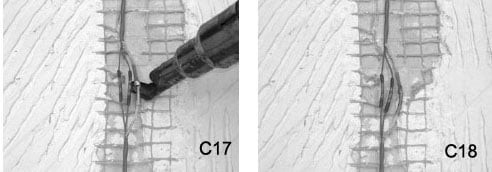
C17 Heat the tube to shrink it completely and cause the solder to flow into the twisted wires completely. When it cools this should make a secure connection.
C18 You should now have a complete connection, ready to test. Go to Step E1 for “TESTING THE REPAIR”.
JUMPER SPLICE
Cut out a 2 to 3 inch long section of the heating cable around the damage, creating two ends, or leads.
If you do not have the Jacketed Heating Cable, SKIP to Step D6.
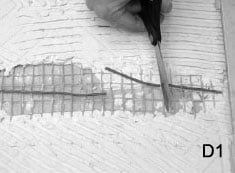
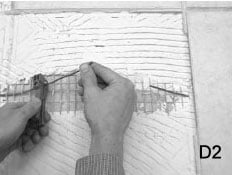
Use the Scoring Tool to carefully score the jacket at about 2″ from the end of each lead. Do this by placing the Cable lead into the v-notch of the tool, and rotate the tool only 1 or 2 revolutions around the Cable. Do not place any additional pressure on the tool head to cut deeper. Let the tool apply its own spring-loaded pressure.
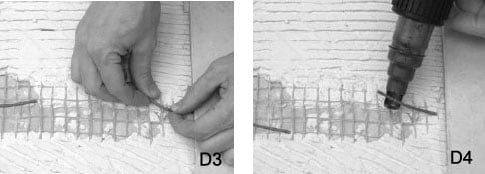
D3 Bend the Cable to snap the jacket slug completely loose at the score.
D4 Use the Heat Gun (set to HI temperature, about 1000F) and move it back and forth under the jacket slug for about 3-4 seconds until you see it start to loosen, slightly shrinking at the ends.
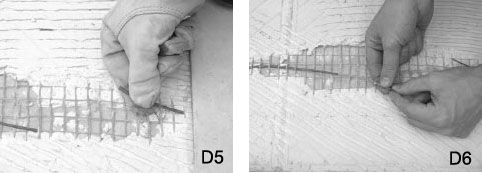
D5 Use a glove or other protective cloth to pull off the loosened jacket slug. Do not touch the hot jacket slug with your fingers. It will burn!
D6 Loosen the braid by pushing back on the braid about 1/4″, causing the ends of the heating wires to be exposed.
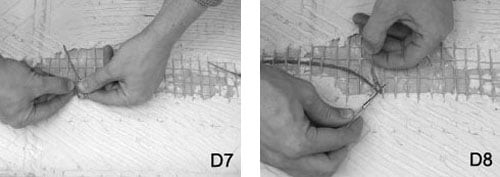
D7 Bend the Cable back on itself.
D8 Use the Small Screwdriver, fingernail, or similar blunt instrument to pry carefully between the braid, making an opening to pull the heating wires through. Pull each wire through the braid.
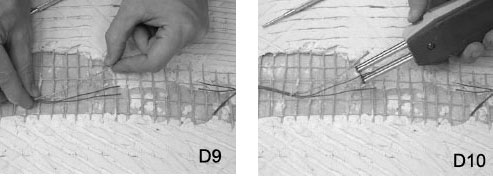
D9 Pull the braid tight to make it into a pigtail.
D10 Use the Thermal Wire Strippers to carefully strip off exactly 1/2″ of the insulation from the heating wires. Count the little heating elements to make sure you did not cut off any, resulting in a hot spot and possible failure. You will also find a strand of fiber with the heating elements. You do not need to separate or remove this fiber
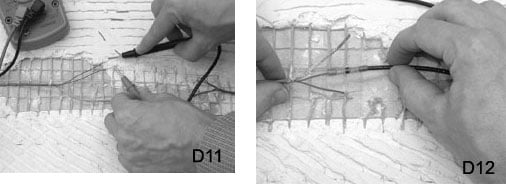
D11 Use the Digital Multi meter and TDR at this repair location before proceeding. Check for any additional damage locations in the heating cable by “looking” in both directions. If you need assistance with this, please read the Instructions sent with each instrument, or contact the factory.
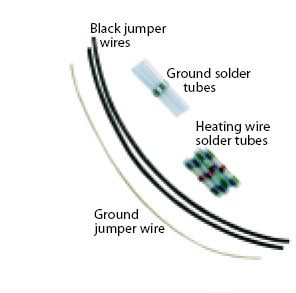
D12 Cut the Black Jumper Wires shorter, if necessary, so they overlap the stripped ends of the heater wires.
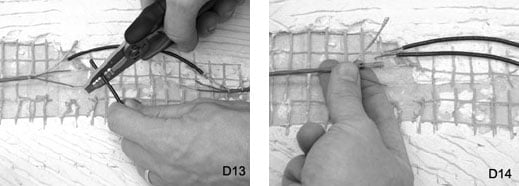
D13 Use the Wire Strippers on the 16AWG setting. Strip off exactly 1/2″ of the insulation from both ends of the Black Jumper Wires.
D14 Slide a Solder Tube over one of the heating wires on one lead of the heating cable.
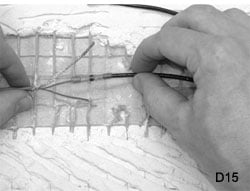 D15 Place the heating elements and Black Jumper Wire ends alongside each other.
Lightly twist them together to better join them.
Slide the Solder Tube over the twisted wires and over the edge of the insulation on the Black Jumper Wire. Make sure the twisted wires are fully inside the Solder Tube, between the adhesive bands at the ends of Solder Tube.
If this is not done correctly, the elements may pull out and cause splice failure.
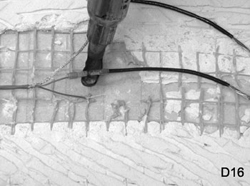 Use the Heat Gun (set to HI temperature, about 1000F) to carefully heat the Solder Tube. Heat directly under the solder ring in the middle first. IMPORTANT! When the solder completely melts and flows into the wires, continue heating for another 3 seconds.
If you stop too soon, an incomplete solder connection will result, causing connection failure later.
When the solder is completely melted, begin moving the Heat Gun back and forth under the rest of the Solder Tube to shrink the tube and cause the adhesive bands at the ends to melt and flow onto the wire insulation. After the tube is completely shrunk and the adhesive bands are fully melted, stop heating the tube. Additional heating will not help and may cause scorching of the tube or failure. Allow the Solder Tube to cool for about 1 minute..
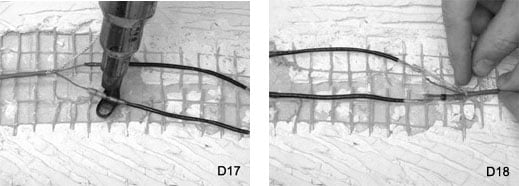
D17 REPEAT Steps D14 through D16 for the other heating wire on the same lead.
D18 At the other end of the Black Jumper Wires, slide a Solder Tube over a heating wire. REPEAT Steps D14 through D17 to complete the Jumper Wire connections at this end.
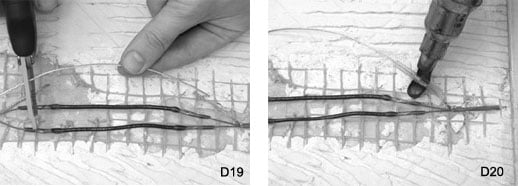
D19 Cut the Ground Jumper Wire shorter, if necessary, so it overlaps the ends of the ground braid lead wires by about 1/2″ to 3/4″.
D20 Overlap the ends of a ground braid lead and the Ground Jumper Wire by about 1/2″ and twist them to help join them together. Slide a Ground Solder Tube over the twisted ends, centering them under the ring of solder. Heat the tube to shrink it completely and cause the solder to flow into the wires completely. When it cools this should make a secure connection.
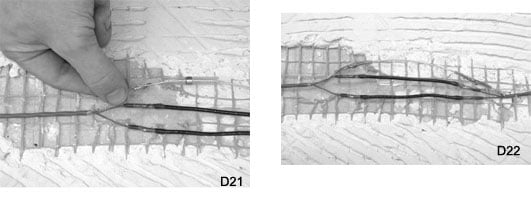
D21 At the other end of the Ground Jumper Wire, slide a Ground Solder Tube over the wire. REPEAT Step D20 to complete this connection.
D22 You should now have a complete connection, ready to test. Go to Step E1 for “TESTING THE REPAIR”.
|
Warranty Disclaimer:
|
| This repair kit and these installation guidelines are provided by SunTouch to assist in repairing a SunTouch heating cable damaged by job site conditions. SunTouch does not, in any way, warranty the repair or ensure proper function of the product following the repair. Only a qualified electrician should make repairs to the SunTouch product. It is highly recommended that an experienced tile installer remove the tile over the damage. For further assistance, please contact the factory.
SunTouch does not qualify electricians, tile installers, or SunTouch installers to do diagnostics, tile removal, or cable repair. It is the responsibility of the installing party or homeowner to contact a qualified person to follow these guidelines. DO NOT USE this Repair Kit to splice different cables together, only for repair within a cable. DO NOT USE this Repair Kit to repair a cable within a shower area or a mat that extends into a shower area. |
TESTING THE REPAIR
After completing the splice connection and letting it cool, test the repair as follows:
E1 Gently tug on each wire splice to make sure it does not pull apart.
E2 Use a Digital Multi meter to measure the resistance of the heating cable.
This measurement should now fall within the Resistance Range specified for this heating cable between the heating wires, and no resistance should be measurable between either heating wire and the green ground wire. If you need assistance with this step, follow the steps shown in the Installation Manual for this cable, or call the factory.
E3 Properly connect this repaired heating cable to the power source through a GFCI, such as the Watts Radiant thermostat. Operate the cable for a few days or at least 10 to 15 five-minute heating cycles. If the GFCI trips or the cable does not heat, the cable will need to be checked for additional damage, or else the repair may have failed.
FINAL STEPS
Make sure the splice is protected and lays flat on the floor before installing floor coverings.
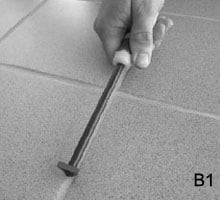
F1 If necessary, use a chisel to carefully carve a valley in the subfloor under the splice.
F2 Use the hot glue gun and place a bead of adhesive into the valley, and press the splice into it.
F3 If floor coverings are not being immediately installed, cover the splice and surrounding heating cable temporarily with a loose tile or similar hard material to protect against site damage.
Click here for SunTouch VIDEO Library
SunTouch vs. Product A – SunTouch vs. Product B
SunTouch Floor Heating Mat Links
SunTouch Mats Spec and installation – SunTouch Mat Specification – Underfloor Spec and Installation
SunTouch Floor Heating Spool Links
SunTouch WarmWire Installation Guidelines – SunTouch WarmWire Strap – WarmWire Installation Guidelines – WarmWire Order Instruction and Information
Heating Controls Links
Programmable SunStat Spec – Owner’s Manual Programmable 500670-SB – Owner Manual Non Programmable 500675
– SunStat Non Programmable Spec – SunStat Relays Control – LoudMouth Operating Instruction
Misc SunTouch Links
SunTouch 25 year Limited Warranty – EMF Electromagnetic fields – Frequently Asked Questions – Repair Heating Wire – Suntouch Low Price Guarantee
Some genuinely choice blog posts on this site, bookmarked.
This is the perfect blog for anyone who wants to know about this topic. You know so much its almost hard to argue with you . You definitely put a new spin on a subject. Great stuff, just great!
What is the fitting shone on the end of the milwaukee heat gun?
How do you find where the break is?
The loudmouth tell you their is a break in the wire, you will need to visually find it.
If the tile already installed then you going to need to take off the tile.
It is good that you pointed out that a knife must not be used in removing enough mortar and tile when freeing the wire from that damaged mortar and use of a scissor is better. As that is a job often done by my brother at home when it comes to repairing a damaged floor heater, that will definitely serve him well. However, he’s not currently around because he’s on vacation until next year and so we will simply hire the service of a repairman or simply buy a new floor heater when necessary.