
Silicone caulking is a versatile sealant used extensively in bathrooms, kitchens, and other moisture-prone areas. Over time, however, silicone caulking can deteriorate, become discolored, or lose its adhesion. Removing old silicone caulking and applying a fresh seal is crucial for maintaining these areas’ aesthetic and functional integrity. Here is a comprehensive, step-by-step guide on how to remove silicone caulking efficiently and effectively.
Tools and Materials You’ll Need
Before beginning, gather the following tools and materials:
- Utility knife or razor blade
- Caulk remover tool or scraper
- Rubbing alcohol or commercial silicone caulk remover
- Clean cloths or rags
- Plastic putty knife
- Painter’s tape
- Protective gloves
- Eye protection
Why One Should Remove Silicone Caulking
Silicone caulking is essential in maintaining a watertight and airtight seal in various parts of your home, particularly in moisture-prone areas like bathrooms and kitchens. However, there are several reasons why you might need to remove old silicone caulking:
1. Deterioration Over Time
Over time, silicone caulking can deteriorate due to exposure to moisture, temperature fluctuations, and general wear and tear. As it ages, it loses its elasticity, becomes brittle, and can crack or peel away from surfaces, compromising its effectiveness.
2. Mold and Mildew Growth
Old silicone caulking is susceptible to mold and mildew growth, especially in damp areas like bathrooms. Once mold and mildew take hold, they can spread rapidly, posing health risks and creating unsightly stains. Removing the old caulking is the only way to thoroughly clean and treat the affected area.
3. Discoloration and Staining
Silicone caulking can become discolored over time, turning yellow or brown due to exposure to water, soap, and cleaning products. This discoloration can make your bathroom or kitchen look dirty and unappealing, even if the surfaces are clean.
4. Loss of Adhesion
With prolonged exposure to water and cleaning agents, silicone caulking can lose its adhesion properties, causing it to pull away from the surfaces it was meant to seal. This can create gaps that allow water to seep through, leading to potential water damage and the growth of mold and mildew behind walls or under floors.
5. Renovation and Repairs
When undertaking renovation or repair projects, removing old silicone caulking is often necessary to ensure a clean, smooth surface for new materials. Removing old caulk is a crucial step in replacing tiles, installing new fixtures, or simply freshening up the look of a room.
6. Aesthetic Improvements
Even if the old caulking is still functional, it may not look good. Over time, caulk lines can become uneven or messy due to application errors or subsequent damage. Removing old caulking and applying a fresh, neat bead can significantly improve the appearance of your bathroom or kitchen.
7. Preventing Water Damage
Old, failing caulking can lead to water leaks that cause significant damage to your home’s structure. Water seeping through gaps in caulking can damage walls, floors, and cabinetry, leading to costly repairs. Regularly replacing silicone caulking helps maintain a strong seal and prevents these issues.
Step-by-Step Guide to Removing Silicone Caulking
Removing silicone caulking might seem daunting, but with the right tools and a clear process, it can be straightforward and efficient. Follow these detailed steps to ensure you remove the old caulking completely and prepare the surface for a new application. Here’s a step-by-step guide to help you through the process.
Step 1: Prepare the Area
Clean the Area: Begin by cleaning the area around the silicone caulking. Use a mild cleaner to remove any dirt, grime, or mildew that might interfere with the removal process. Ensure the surface is dry before proceeding.
Protect Surrounding Surfaces: Use painter’s tape to cover adjacent surfaces that you don’t want to scratch or damage. This step is particularly important when working in tight spaces or near delicate materials like tile or glass.
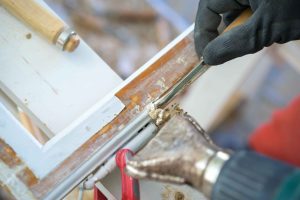
Step 2: Cut the Caulk
Score the Caulk: Using a utility knife or razor blade, carefully score along the edges of the silicone caulking. Hold the knife at a shallow angle to avoid scratching the underlying surface. Make parallel cuts along both sides of the caulk line.
Create Lift Points: If the caulk line is long, make perpendicular cuts every few inches to create sections that are easier to remove.
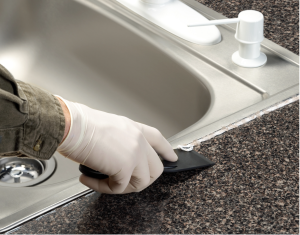
Step 3: Remove the Caulk
Lift and Peel: After scoring, use a caulk remover tool or scraper to lift and peel away the silicone caulking. Start at one of the lift points you created and gently pry up the caulk. If the caulk is stubborn, use your knife to cut it into smaller pieces that are easier to manage.
Pull Slowly: Once you get a section started, pull slowly and steadily. Try to remove as much caulk as possible in one piece to minimize residue.
Step 4: Apply a Caulk Remover
Use a Chemical Remover: For any remaining caulk, apply a commercial silicone caulk remover or rubbing alcohol. These products soften the silicone, making it easier to remove. Follow the manufacturer’s instructions, typically applying the remover and letting it sit for 10-15 minutes.
Let it Soak: Allow the remover to penetrate and break down the silicone. This step is crucial for areas where the caulk is particularly stubborn or thick.
Step 5: Scrape Away Residue
Use a Plastic Putty Knife: Once the caulk remover has softened the silicone, use a plastic putty knife to scrape away the residue. Plastic tools are preferred to avoid scratching the surface.
Wipe Clean: Use a clean cloth or rag to wipe away the loosened silicone. You may need to repeat the application of the caulk remover and scraping process several times to remove all the residue.
Step 6: Clean the Surface
Final Cleaning: Clean the area thoroughly with rubbing alcohol or a mild cleaner to ensure all silicone residue is removed. This step is crucial for the adhesion of new caulking.
Dry Completely: Allow the surface to dry completely before applying a new caulk. Moisture can interfere with the adhesion of the new silicone.
Step 7: Inspect and Repeat if Necessary
Check for Remaining Caulk: Inspect the area closely to ensure all silicone is removed. Run your finger along the surface to feel for any remaining residue. If you find any, repeat the previous steps until the surface is completely clean.
Tips for a Successful Silicone Caulk Removal
- Take Your Time: Removing silicone caulking can be a tedious process. Working slowly and carefully will yield the best results and prevent damage to surfaces.
- Use the Right Tools: Investing in a quality caulk remover tool can make the job easier and more efficient.
- Safety First: Always wear protective gloves and eye protection when working with sharp tools and chemical removers.
- Follow Product Instructions: When using commercial caulk removers, always follow the manufacturer’s instructions for safe and effective use.