Satisfaction guaranteed. Call us anytime at 323-731-8453.
Do It Yourself | Flooring Supply Shop Blog - Part 17

Raimondi Tile Spacer Leveling System

Raimondi tile leveling system, RLS wedges, RLS spacers, RLS-KIT, tile, leveling, lippage, flat surfaces, spacers, installation

The most important as well as the most daunting aspect of setting tiles is to achieve perfect leveling. A common hindrance faced while setting larger format, thicker tiles as well as un gauged and thin tiles is the uneven floor foundation, which makes leveling all the more difficult. As a result, tiles that seemed leveled during installation often have unevenness in the height, once the thinset or adhesive cures, which is unappealing. This can, however, be overcome with the help of ‘Raimondi Tile Spacer Leveling System’ that ensures perfect leveling of the tiles. Fabricated using quality raw material, these spacers are durable, cost effective and easy to use. Not only does it result in proper leveling of the tiles, but also facilitate the tile setting process.

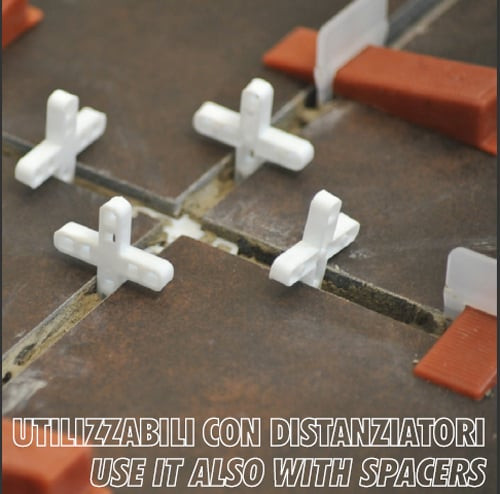
Achieving a smooth level surface, the Raimondi leveling spacers can be used for tiles with varied dimensions. For a tile thickness of minimum 1/8", maximum 1/2", a minimum 3/32" joint is required, which at times is difficult to achieve. However, with the help of the spacers it is no longer a daunting task and can easily be accomplished in just few minutes. Depending upon your requirement, you can select amongst the different Raimondi leveling system kits that include leveling wedges, spacer clips and installation pliers.

Raimondi tile leveling system, RLS wedges, RLS spacers, RLS-KIT, tile, leveling, lippage, flat surfaces, spacers, installation

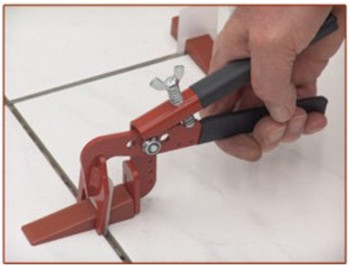
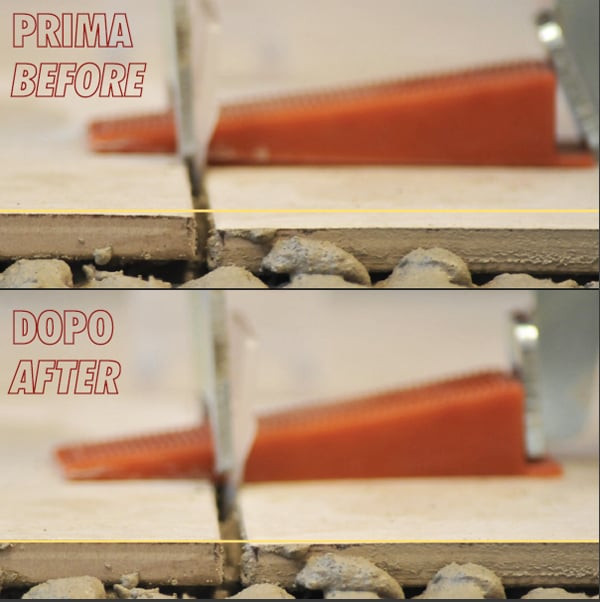
One does not have to be a well-qualified professional to use the Raimondi leveling spacers. These spacers are quick and easy to set & remove, and homeowners can do it on their own, without any professional guidance. In case you plan to install tiles on your own, you can make use of these spacers for proper leveling of the tiles. After spreading the tile adhesive, you need to insert the support underneath the tiles on all the sides. In case of larger and thicker tiles, it is advisable to use two support instead of one, on all four sides. Once properly done, set the tiles over the adhesive, and to strengthen the bond you can beat it with a rubber mallet. Next, you need to insert the wedges into the support, which can be easily done by using the special traction-adjustable pliers. However, you need to exercise caution not to pass the breaking point. After the tile adhesive sets and cures, the leveling support needs to be removed, which can be done with the help of special traction-adjustable pliers or rubber mallet. Instead of using these tools, you can easily remove these supports by simply kicking them with your feet, but make sure to beat parallel to the joint.

Raimondi tile leveling system, RLS wedges, RLS spacers, RLS-KIT, tile, leveling, lippage, flat surfaces, spacers, installation

Not only is the Raimondi leveling spacer easy to set and remove, but has various other features that have made it a preferred choice of many, especially tile installers. Consuming less time and effort, it holds the tiles firmly in place. One does not have to worry about the voids or coverage as the Raimondi leveling spacer enhances the adhesion of the thinset to the tiles. Rather than pulling tiles from the thinset, these are pushed into it, which is easier. Since it is quick and easy, it greatly improves the overall quality of the tile installing project.

Click Here to View Action Video

Copyright © 2010 FlooringSupplyShop.com

Solutions for Small Kitchens

Kitchen remodeling, bathroom remodeling, ceramic tiles, Hardwood floor. Laminate flooring, stone, marble, granite, travertine

Many homeowners face the problem of not having enough space in their kitchens. Due to the shortage of space, one may either collide with things kept in the kitchen or step on someone else’s toe while trying to reach something. Moreover, one does not even feel like cooking in such a small space. Additionally, one also has to adjust various kitchen items in the tiny space, making it cluttered and untidy.

In case you also have a small kitchen and face such problems daily, there are certain useful steps that can help you overcome space constraint. Foremost, you can make use of various designing tips to create an illusion of space. An easy way of achieving this is through proper lighting, such as, take measures to maximize any natural light by keeping the blinds up and curtains back. In case you wish to add more lights, but do not want to take up any valuable space, you can install lights under the cabinet. Apart from this, you can also use light colored walls, curtains, blinds and cabinets, to make the room look more open.

Kitchen remodeling, bathroom remodeling, ceramic tiles, Hardwood floor. Laminate flooring, stone, marble, granite, travertine

You must also ensure maximum use of available space in a proper manner. Foremost, you should take a look around your kitchen and sort out things as per the frequency of their use. Things that you do not use frequently like juicer or food processing machine, can be removed from the kitchen and stored somewhere else, such as the store room or garage. The next thing that you need to focus upon is the arrangement of things, such as you should keep the cooking utensils and oven mits near the stove. You must keep all the necessary and most used items in an easily accessible place, so that one does not collide with other things or people.

You always have the option of arranging various kitchen items in cabinets that can easily accommodate numerous things. However, if the cabinet is not large enough to solve the space problem, you can install lazy susans and dividing trays in these cabinets. This is also an effective solution in case one is not able to maintain different cabinets for specific group of items. Incorporating ample storage facility is probably the most effective and easiest way of overcoming space problem in small kitchens. Besides, you can even opt for hang up pots and pans that empties a lot of space in the cabinets.

Apart from this, you can also have deeper counters as these not only increase work space, but can also accommodate more items. Additionally, to minimize the use of space, you can select drop table, small sized round table or built-in counter along the wall. It is always advisable to install a large kitchen sink, as it is very convenient and suitable for washing pots and pans.

With the advancement in technology, now you have access to various compact and space saving appliances. Numerous brands are designing products for small kitchens, such as microwaves that can be hung underneath cabinets. You also have the option of choosing refrigerators that are 24 inches deep instead of 30 inches deep.

Making use of these simple measures can help you overcome the problem associated with small kitchens.

Copyright © 2010 FlooringSupplyShop.com

Benefits of Suspended Ceilings

Tile ceiling, metal ceiling, ceiling, embossed metal, tin ceiling panels, drop ceiling, suspended ceiling, embossed metal ceilings, decorative ceilings, decorative tin ceilings

Suspended ceilings are referred as dropped ceiling or false ceiling, which give the perfect example of modern architecture and construction. These are hanged from the ceiling joists with a metal grid thereby creating a space between the ceiling and the joists where pipes or duct work can be installed and worked on.

Suspended ceilings not only improve the décor of the house but also provide several advantages as well. These ceilings can be installed with utmost ease in any room or building, home or supermarkets. Apart from their practicality in installation, suspended ceilings also offer fire resistance, bacteria & humidity resistance, and insulation at a very less price.

Suspended ceilings are cheaper to install under existing ceilings as compared to renovating the old ceilings. Suspended ceilings are especially useful in industrial and commercial settings where buildings must adhere to strict fire safety rules, as the ceiling tiles offer fire resistance.

Suspended ceilings provide bacteria and humidity resistance, and for this reason these are widely demanded in hospitals. Apart from the medical sector, these are also used as fixed panels in places like changing rooms or shower rooms, as these kinds of places tend to have a lot of humidity. This in turn prevents these places from getting damaged.

Suspended ceilings are highly useful as you can keep cables, pipes, unsightly wires and ducts stacked inside them, which are easily accessible when you want to get some maintenance work done. These tiles can be taken out with ease, and you can conveniently access things which require constant attention.

Tile ceiling, metal ceiling, ceiling, embossed metal, tin ceiling panels, drop ceiling, suspended ceiling, embossed metal ceilings, decorative ceilings, decorative tin ceilings

Besides being a protector to your house against fire threat or moisture attack, suspended ceilings also provide insulation. This is because when ceilings are installed, a static layer of air between the main ceiling and the drop ceiling is created, which acts as a great insulator. The lower ceiling reduces the amount of airspace in the room, which subsequently warms up the place, thus lowering the heating bills.

Not only do these ceilings provide thermal insulation, but are also used as acoustic insulation, as these are capable of reducing noise. One can also choose the tiles with a decibel value that provides extra soundproofing. Suspended ceilings are available in many different designs and can be easily adjusted with new panels being fitted into the ceiling grid. Several different textured and designer panels are available in the market that one can select from. Also, these ceilings come in different shapes and colors that can add beauty to your home or workplace.

Suspended ceilings are rapidly gaining popularity, as these are easily demountable, which and can thus easily uphold the ceilings. These can be conveniently replaced by detaching the grids, and thus are better than permanently implemented ceilings, which are difficult to change in the future. The tiles used in suspended ceilings can also incorporate lights inside, which can hide the bulbs and give the place a contemporary and sophisticated look. With all these benefits, your confusion for insulation and renovation must be over.

Pictures provide by Ceilume – the Smart Ceiling Tile

Copyright © 2010 FlooringSupplyShop.com

Safety Tips for Shoveling Snow

Suntouch snow melting system, radiant heat, electric radiant heat, snow melt systems, radiant floor heating, floor warming, electric floor warming, warm floors, warm floor

Most people love winter season, but one thing which everyone hates about winters is the snow menace. Shoveling snow is probably the most hated activity of the winter months that poses significant health risks. Snow shoveling is a daunting task and the overexertion caused by this activity can sometimes lead to health complications and even death. This demanding task puts pressure on the heart and can cause heart attack; especially at low temperatures, when blood vessels contract and the heart pumps faster to get blood to the extremities. Besides heart attack, there are various other problems that a person can face because of shoveling snow. Due to the repetitive lifting of heavy weight snow, one may put strain on the muscles and back. In order to avoid such complications, one needs to take preventive measures to stay safe.

Before you plan to shovel snow, you must consider your health condition. In case you have heart condition or back problem, you must certainly avoid snow shoveling. Even otherwise, do not jeopardize your health and check with your doctor if you are fit to shovel snow. Apart from health condition, also consider your physical condition. If you lead a sedentary lifestyle or are out of shape, you must proceed with caution. Before you start this physically challenging activity, you must stretch and warm-up like you would do before a strenuous activity. You must also drink some water to remain hydrated.

Suntouch snow melting system, radiant heat, electric radiant heat, snow melt systems, radiant floor heating, floor warming, electric floor warming, warm floors, warm floor

In case you are planning to shovel snow yourself, there are few simple things that you need to keep in mind. Foremost, avoid lifting snow-filled shovel as much as possible because it can be strenuous; instead try to push off the snow from the driveways, sidewalks or walkways. However, if it unavoidable and you do have to lift snow then you must face the direction in which you are lifting, but avoid twisting. On feeling sore or fatigued, you must stop shoveling for few minutes, take some rest and then start again. You must avoid over-exhausting yourself at all costs to avoid risk of heart attack. If it is extremely cold and you begin to feel its effects, stop shoveling and take rest, go inside for a while.

There are certain snow shoveling safety tips that you must always follow, such as you must never shovel immediately after you wake up. Lying down all night leads to build-up of fluid in the disc and a minor accident like fall increases risk of slipped disc injury. Dress in layers to keep yourself warm, and you can shed off layers as you become warm. Make sure to wear slip resistant boots and eye gear. In order to keep snow from sticking to the shovel, you can spray or rub some lubricant on it. It is advisable to keep the load lighter and take frequent breaks. Once you have cleared the snow, spread some rock salt to avoid icing.

Suntouch snow melting system, radiant heat, electric radiant heat, snow melt systems, radiant floor heating, floor warming, electric floor warming, warm floors, warm floor

In case you have a snow thrower, ensure to follow all the safety guidelines to avoid injuries. Even after shutting off, the augur blades can continue to rotate and one can reach into the snow thrower and suffer injuries. In such cases, people tend to break fingers or damage tendons, while some injuries are worst and can result in maiming or amputations. Hence, whether you shovel snow manually or with the help of high-powered snow thrower, be careful and take measures to avoid accidents or injuries.

Safety First!!!

Copyright © 2010 FlooringSupplyShop.com

Safety Tips for the DIY

Atlas Gloves, Ugly Gloves, Grout Gloves, Respirator, Knee Pads, 3M 8210 Particulate Respirator Masks

Do-it-yourself or DIY is an effective way of saving money that more and more people are using for various home improvement tasks. However, while doing the job, accidents can occur that can sometimes be serious or even fatal. Although people undertake DIY home renovation project for saving money, but an unfortunate accident can make him/her incur heavy medical expenses. Hence, to avoid such unpleasant circumstances, it is advisable that people should take appropriate precautions to minimize the risk of injury or danger.

If you are planning to undertake a DIY task, take appropriate safety measures to avoid occurrence of accident. It is generally recommended to take advice from a person who has already done similar DIY task, as he/ she can provide useful tips & guidelines to do the job safely. The person can also inform about various precautionary measures that you need to take in order to avoid any mishap.

Safety tips may vary from one task to another; however there are certain precautionary measures that you should always take, irrespective of the kind of job undertaken. First and foremost, always keep a first aid kit handy and well within your reach at the time of doing a DIY task. The kit must be well stocked with mild anesthetic, sterile gauge pads, antibiotic cream, adhesive bandages, scissors, gloves and other essentials.

Furthermore, be practical about your attire; wear sturdy clothing, gloves, and work boots. Avoid clothing with long, loose sleeves as there are chances of them getting caught in-between the moving parts of tools. You should also avoid wearing flip-flops, shorts, watches, and bracelets while executing a DIY task. Make sure to wear safety glasses to protect your eyes from dust and debris. Additionally, you should also wear dust mask to avoid inhalation of dust and fibers, which can be hazardous. If you are using loud power tools, always wear earplugs to prevent damages to your ears.

Most of the DIY enthusiasts get injured because of not using the right tool in the right manner. To avoid this, make sure that you have the right tools for the job, along with the information to use it appropriately. Before using any equipment, read all the instructions carefully and follow them diligently to avoid any accident. Ensure that the blades, drill bits and cutters are sharp because dull tools tend to bind, which can be dangerous. When using power tools, do a thorough inspection and check for cracked or broken casing, and frayed power cord. In addition, make sure that the safety guards are intact. Always unplug the tool before adjusting or servicing it, and also when you are not using it. At all times, keep the tools away from the reach of children and pets.

If you are working in a group, maintain safe distance from co-workers to ensure that you do not hit them with your tool or bump into them. Once you complete the job, always clear up the workspace, so that there are no debris, nails or other dangerous material left, which can lead to accident or injury.

Along with following a systematic approach; if you adhere to these simple tips while doing a DIY task, then you can easily reduce the risk of accidents and injuries.

Safety First!!!

Copyright © 2010 FlooringSupplyShop.com

Do It Yourself | Flooring Supply Shop Blog - Part 17