When installing ceramic tile on roof decks, the most important single thing to remember is that a roof deck is just that, a roof – a barrier against the elements and especially water.
“It’s only a roof deck!” Did you ever hear that statement? When and if you do, be prepared for problems, and very possibly big ones. Where roof decks and concerned, roof is the most important word. When it comes to keeping water out, how the roof deck is constructed is at least as important as the balance of the roof itself, since both must satisfy the same requirement to keep the rooms and equipment below them dry.
SOME BAD EXAMPLES
A roof deck was leaking badly. Upon investigation, it was found that the installation had been made using one of the methods described in the Handbook for Ceramic Tile Installation. Why, then, the leakage? The method selected was one involving a cleavage membrane, and it had been chosen even though some of the other methods contained in the Handbook called for a waterproof membrane. The purpose of the cleavage membrane, as you will recall, is to isolate the tile floor from the structure, not to serve as a waterproof membrane.
Another somewhat similar project was purposely installed over a cleavage membrane consisting of a single layer of roofing paper. Those responsible for the installation thought the horizontal tile were waterproof, and therefore did not need a waterproof membrane. But while ceramic tile floors do not disintegrate when wet, they are not waterproof. A good waterproof membrane like Composeal Gold Crack Isolation Waterproof Membrane is the only insurance against water damage in the rooms under a roof deck.
Two residences came close to taking the prize for most water damage. Built by the same contractor for two sisters, the houses faced each other, with a street in between them. The houses were already completed, with carpets, furniture and kitchen equipment in place, but before anyone could move in, the rains came – heavy rains. The resulting damage to ceilings, walls, furniture and carpets made the homes impossible to occupy. Much of the water came down in the kitchens, where cabinets were soaked, discolored and warped out of shape. What had happened? Each house had a rear, exterior, second story, tile deck which sloped the wrong way, toward the house, with nothing to prevent the water from going through the metal sill of the large sliding doors and into the structures.
Yet another common shortcoming in deck construction is the improper placement of flashing, or even its complete lack, at the junction of the walls and floor. A number of leaky decks have been found in which the lack of flashing has been the cause of the leakage.
Recently, an owner was having problems with leaks in a tiled deck. It started with leaks in the first deck to be installed; after the first deck was replaced, the new deck also leaked. The owner called for advice on how to make sure a third deck would not leak. She was advised on how the deck should be constructed, and was also urged to water – test the Composeal Gold Waterproof Membrane before installing the ceramic tile. The water test had to be stopped immediately because of the torrent of water that flowed into the room below. It is hard to understand how workmen can be so careless or lacking in knowledge as to allow such a membrane to be water- tested. The roofer had terminated the waterproof membrane *” short of membering up with the roofed-over part of structure, and the builder had done nothing to flash and waterproof that joint prior to the water test.
SLOPE ON STRUCTURE
In 1956, working with the International Association of Plumbing and Mechanical Officials, sponsors and authors of the Uniform Plumbing Code, tiled shower floor receptors were at last properly engineered and made part of the Uniform Plumbing Code.
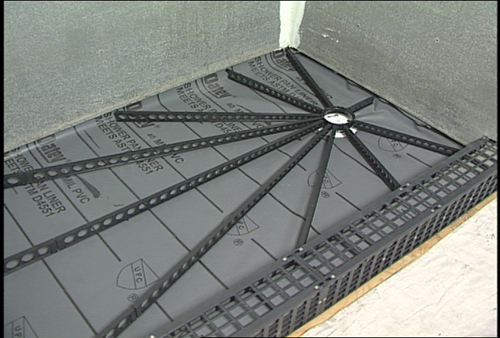
The important part of this engineering called for pre-sloping the floor of the shower prior to placement of the waterproof membrane. The waterproof membrane was then placed in the pre-sloped surface so that the membrane itself sloped- – *” per foot minimum, *” per foot maximum- – to the weep holes in the bottom portion of the floor drain.
Prior to this, it had been customary to place the membrane flat, thus allowing seepage water to accumulate with no way to reach the weep holes and go down the drainpipe.
Shower floors are smaller than roof decks, but the same engineering principles apply. Slope the structure and Composeal Gold Waterproof Membrane to the weep holes in the floor drains; if there are no floor drains, slope to the open scuppers, with nothing in the bottom of the scuppers to prevent the free flow of seepage water.
FLAT DECK STRUCTURES
No matter how hard we try to spread the word about sloping them, structures continues to be built flat. The point of sloping the structure, which in turn slopes the membrane placed upon it, is to eliminate seepage water via the weep holes or open scuppers. The tile trade uses dry-pack floor mortar, and when this is placed on the flat waterproof membrane, the slope is only on the top surface of the dry pack. The dry pack is pumped out by the hot sun, leaving the salts of efflorescence on the tile. At least one company’s remedy for flat roof construction is to pre-float the roof deck with the dry pack mortar, which is then cover-cured. A waterproof membrane, designed to be used with a thin-set bonding system, is bonded to the mortar bed and fastened into the clamp-style floor drain. A compatible bonding mortar is then used to bond the tile to the membrane.
A SEEPAGE CHANNEL
In the design of roof decks, an effort has been made not only to slope the roof deck, but to create a channel which makes it easy for seepage water to flow toward the drain and into the weep holes. Until quite recently, the standard channel consisted of a layer of crushed rock over the waterproof membrane. A layer of cloth, such as burlap, was then placed over the crushed rock to prevent the mortar from filling up the voids in the crushed rock when the mortar bed was installed.
Now we have matting to provide that channel. The matting comes with a flannel – like cloth covering, which is installed cloth side up to prevent the mortar from filling in the extruded nylon and black spinnerette fibers. This type of matting has a long history of successful use in providing weep channels under concrete in drainage ditches and in similar situations.
An installation showing the use of the channel to promote water runoff is contained in the Handbook of Tile Installation. Even though this is the recommended way to install tile on roof decks, in actual practice, the channel is not always used. No matter what is done, however, positioning the waterproof membrane on a slope to the weep holes, or open scuppers, is the most important requirement for roof deck construction.
WATER ACCUMULATION
If the walls surrounding the roof deck are properly flashed at the juncture of deck and walls, and drip screeds are used, some water is going to drain across the tiled deck in addition to the rain which falls upon it naturally. However, it is best to not use the deck as a collection basin for water drainage; on the contrary, as much water should be kept off the roof decks as possible.
Directing water to the drains or scuppers takes some planning as to the positioning of those structures. Getting the water to move requires a slope of *” per foot. One – eighth of an inch per foot will drain the water, but will take much longer to do it; *” per foot, on a long run, may not be achievable because of the thickness build-up from the furthermost distance from the drain to the drain. To prevent problems, planning is needed as to the placement of the drains, as well as the height of the tracks for doors and sliding doors. Many, many times we have received calls describing situations in which only *” is available at the doorway to install a 2″ thick tile installation, and there is no way to drain the deck.
SUMMARY
“It’s only a roof deck!” As can be seen from the foregoing, construction of a roof deck takes planning. It is not difficult; it just has to be planned. It can also be seen that proper planning and execution require the cooperation of several trades working together.
Technical Data
COMPOSEAL 30 and 40 meet the engineering requirements of the American Society for Testing and Materials (ASTM) and the Ceramic Tile Institute (CTI). ASTM D4551 is the test standard established by ASTM
“for PVC flexible sheeting which is used with mastic, bedding or coating for construction of concealed water-containment membranes in applications where there is potential for costly secondary damage from water leakage and very long term reliable performance is essential. The tests are intended to ensure quality and performance.”
COMPOSEAL 30 and 40 meet and surpass these ASTM standards.
COMPOSEAL 30 and 40 also meet the CTI requirements for waterproof membranes.
TESTED MATERIAL
CERAMIC TILE INSTITUTE OF AMERICA
These tests were conducted by the United States Testing Co., Test Report No. LA 63554, Smith Emery Co., Test No. T-88-122A-B, and Truesdail Laboratories, Report # 24371-1.
Tile work shall comply with recommendations of “Handbook for Ceramic Tile Installation” published by the Tile Council of America, Inc., P.O. Box 2222, Princeton, N.J. 08543
* These drawings based on sketches in “Handbook for Ceramic Tile Installation.”
| Engineering Properties | ASTM D 4551 SpecGrade 30 | ASTM D 4551 SpecGrade 40 | Composeal Test Results .030 | Composeal Test Results .030 |
|---|---|---|---|---|
| Thickness, inches | 0.30″ | 0.40″ | 0.31″ | 0.42 |
| Tensile Strength. lbs/in. width | 60-lb min. | 80-lb min. | 89-lb (2870 psi) | 113-lb (2700 psi) |
| Tensile Strength. at 100% elongation | 30-lb min. | 40-lb min. | 43-lb | 57-lb |
| Ultimate elongation before breaking | 300% Min | 300% Min | 400% + | 400% + |
| Tear Resistance. lbs/in width | 185-lb min. | 250-lb min. | 260-lb | 263-lb |
| Pinholes | None | None | None | None |
| Micro-Organism Resistance (fungus, mildew, mold) | No Growth | No Growth | No Growth | No Growth |
| Chemical Resistance: | ||||
| Distilled H2O % wt. change* | 1% max | 1% max | + 0.4% | + 0.4% |
| Soapy H2O % wt. change* | 2% max | 2% max | + 0.5% | + 0.3% |
| Alkali, pass/fail (hydrostatic) | Pass | Pass | Pass | Pass |
| Shrinkage, dimension change at 158 F ASTM 1204 | 5% max | 5% max | 1.3% | 2.9% |
| Volatility, % loss at 158 F after aging | 1.5% max | 1.5% max | None | None |
| Hydrostatic pressure (to test water penetration): | ||||
| Original Condition | Pass | Pass | Pass | Pass |
| After Folding test (cold crack, 4hrs @ 0F) | Pass | Pass | Pass | Pass |
| After Puncture test | Pass | Pass | Pass | Pass |
| After Indentation test | Pass | Pass | Pass | Pass |
No evidence of surface wetness or other signs of water penetration was detected on any of the tested specimens.
Additional Test :
Seam, (lap joint) strength ASTM D751 CTI Standard – 8 lbs./in. min. / Composeal 30 – 69 lbs./inch / Composeal 40 – 85 lbs./inch
Specific Gravity: 1.29 @ g/cm3
Cold Crack: passed @ 53 F
ASTM Standard D1004, d 412 d1790, e 96 and FHA Spec. 4900.1 are also met by Composeal
*Measure of water/ chemical surface absorption
Made in USA – 100% American Labor and Materials.