Satisfaction guaranteed. Call us anytime at 323-731-8453.
Flooring Supply Shop Blog | Flooring and Floor Heating Supply - Part 5

Advantages of Installing a Custom Shower Pan

Preformed Custom Shower Pan

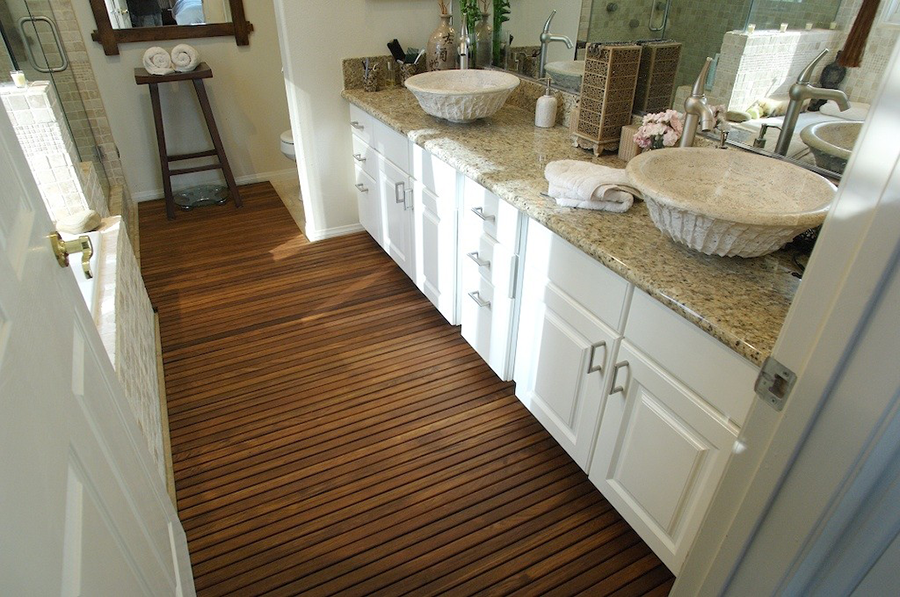
Have you been considering whether a custom shower pan is worth installing for your bathroom remodeling project? If you’re unfamiliar with custom shower pans and their benefits, then this article is for you. We’ll discuss the advantages of adding a custom shower pan to your bathroom, and why it’s a worthwhile investment.

Custom Tailored Fit

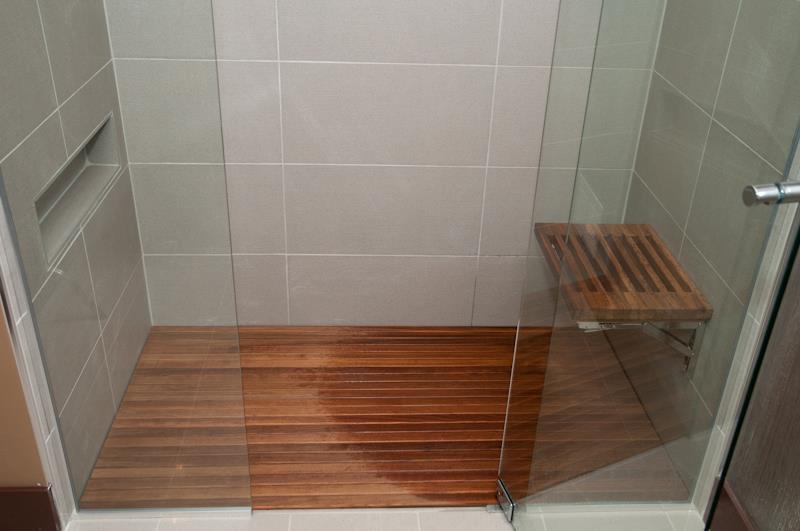
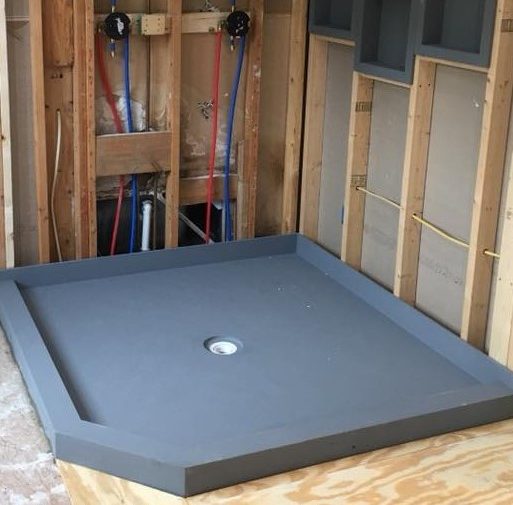
One of the first things that separate custom shower pans from traditional shower pans is their suitability in any shower dimensions.While typical shower pans have limited size options, custom shower pans, on the other hand, offer multi-variant options that can be tailored to fit your unique bathroom measurements.

Having a custom shower pan tailored explicitly to your bathroom enables you to have more flexibility and take full advantage of what a functioning shower pan has to offer.

Prevents Leakage

An excellent way to prevent leakage is by ensuring that your bathroom has properly fit and installed shower pans with no gaps, spaces, and a watertight seal.

The last thing anyone wants is to deal with leaking showers, mold growth, or other structural damages that can lead to costly problems over time. That’s why homeowners looking to remodel their bathrooms prioritize ensuring their custom shower pans are properly functioning. A well-designed shower pan is an essential element that every shower needs to prevent these issues and ensure a long-lasting, comfortable shower experience.

Effortless maintenance

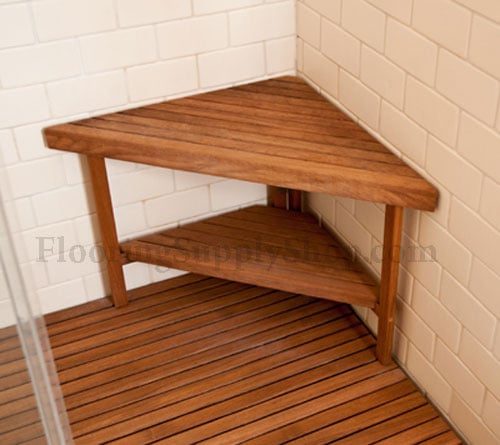
The ease of maintaining and preserving the overall function of custom shower pans can vary depending on the source and quality of the product. That said, custom shower pans made from high-quality materials are typically designed to be resistant to stains, scratches, and chipping, making maintenance and upkeep easier.

By choosing a reputable source like Flooring Supply Shop for your custom shower pans, you can enjoy the benefits of a low-maintenance and long-lasting solution for your bathroom.

Installed within minutes

Many of those who already have an experience in renovation, or specifically towards bathroom remodeling projects, is that it can take a while to finish—considering the time it takes to have a fully formed project plan, execution, installations, and reiterations. Custom shower pans are designed specifically to solve this overbearing concern of complex and lengthy installations.

Since these shower pans are specifically built to perfectly fit your shower dimensions, it eliminates the need for time-consuming and labor-intensive tile work, giving you both efficiency and precision for the task at hand. For better results, it is still best to let a professional handle the installation to avoid minimal yet costly mistakes.

Final thoughts.

Bottomline, custom shower pans provide homeowners an excellent option to build an aesthetically pleasing, durable, and functional shower experience that will last you for years to come.

If you’re planning a weekend project to upgrade your bathroom, consider finding a reputable source for a custom shower pan. At Flooring Supply Shop, we present a wide selection of high-quality shower pans that can instantly transform your bathroom and sweeten your shower experience.

Have you found this article helpful? Comment down below and share us your thoughts in the comment section below.

How to Polish Granite Countertops?

Polished Granite Countertops

There are tons of reasons why granite material is such as prevalent material to use for kitchen countertops. They look dashing, are incredibly durable, are available in diverse layouts, and could set your kitchen apart from the ordinary.

Like any other material, granite countertops could also use a bit of maintenance if you want to avoid them looking dull and less impressive than they used to. One of the best ways to preserve your granite countertops is through polishing.

In this guide, we’ll discuss some of the different factors to consider and how to polish your granite countertops that will effectively keep them looking good as new.

Why do granite countertops fade?

First and foremost, let’s discuss what exactly makes your granite countertops look dull and worn. It is essential to consider that granite countertops, especially inside the kitchen, are prone to many substances that may gradually contribute to losing their shine. This often includes water, soaps, grease, oil, food, coffee, and other chemical build-ups that coat your countertop’s exterior, making it look dull and worn out after a few years.

What tools do you need for polishing granite countertops?

Revitalizing your granite countertops requires a few tools and compounds that will make the procedure much easier and more effective. Here are some basic materials you’ll need for buffing granite countertop.

How to polish granite countertops?

Quick and easy granite cleaner compounds often do the trick for achieving that nice and shiny exterior look. However, when deep scratches and other damages are already making your granite countertops look dull and old, you’ll need to approach it using power tools for in-depth restoration. 

  1. Mark the area where you’ll be working on.
  2. Spray water into the section of your countertop that you plan to polish.
  3. Before beginning to polish, ensure your polisher grinder is flat on the surface to prevent unnecessary damage.
  4. Begin polishing and position your rear hand on your hand power tool’s body while the other hand is on top of the head. This technique will help you to apply pressure downward as you run through the surface gently.
  5. Follow a circular pattern as you polish your granite countertop.
  6. Take breaks and use a dry towel to remove dust regularly to inspect if you’re achieving the desired look.
  7. Repeat the procedure until you’re satisfied with the finish.
  8. Squat down to an eye-level position with your countertop to properly inspect if you need more run-throughs.
  9. Continue with the procedure until you can no longer distinguish the area you are working on as it blends in with the rest of the countertop surface.
  10. The final part of the process includes a polishing compound that will significantly bring back that previous glow or shine of your countertops.

How often should you polish granite?

Granite Countertops are often one of the main highlighted features you’ll first notice when entering the kitchen, which is why preserving its lovely finish is vital for your interior’s aesthetics.

So how often can you polish granite? The standard procedure of polishing includes power tools, and polishing compounds are typically done at least every 5-15 years, depending on the current state of your granite countertops. 

Suppose you want to keep them looking nice and clean daily. In that case, you can opt for quick and easy maintenance methods that only include formulated compounds like this granite counter cleaner that will help restore your countertop’s shiny exterior within minutes.

Can you polish granite countertops on your own?

There are numerous different methods from various resources online like this, which you can follow step-by-step to achieve a better-looking finish for your granite countertops. You could polish your granite countertops if you are willing to do the necessary research for safety purposes and avoid errors.

However, letting professionals handle the task is always the better alternative if you have the budget, as they’ll have more knowledge and experience to do the job more effectively.

Final thoughts

With the right tools and proper techniques, you should be able to enjoy your gorgeous granite countertops on a daily basis. Hopefully, this guide has provided you with enough information that you can apply for your own. 

Have you found this article helpful for you? Discover many valuable tips and tricks like this here at Flooring Supply Shop Blog today!

Best Teak Shower Accessories

Teak Shower Mat and Benches

Aside from its inherent qualities, such as water resistance, mold-resistant properties, and more, there’s really something about teak furniture that creates that spa-like ambiance that elevates your shower experience. 

Now is the right time if you’ve been considering a quick and easy shower remodel. To help you achieve that luxurious sense and boost relaxation for your showers at home, here are some of our most recommended teak shower accessories that you’ll certainly love!

Premium African Teak Shower Mats

Teak Shower Mat

This Premium African Teak Shower Mat is one of the best accessories you can add to your shower that will instantly enhance both functionality and aesthetics. These shower mats are excellent for high-moisture areas as they are water-resistant and inhibit safety from their anti-slip properties. What’s great about these teak shower mats is they are highly versatile, and there are a bunch of ways you can use them inside or even outside the shower.

Teak Shower Stool

Teak Shower Bench

Shower stools are great and can be an excellent addition to any shower. It allows you to sit back and relax if you want to destress after a long hard day at work. Unfortunately, most shower stools aren’t intended for a humid environment and constant water exposure. A Teak Shower Stool is an excellent choice as they are susceptible to water exposure, giving you durability and convenience that you’ll enjoy for years to come.

Teak Corner Shower Bench

Teak Corner Shower Bench

Looking for a perfect bench for smaller bathroom spaces? This is the perfect solution for you! Teak Corner Shower Benches are pre-assembled and designed to fit perfectly for corner spaces without compromising comfortability and design. You may also use this corner shower bench as a table for discreet bathroom decorations.

Hand-Woven Teak Bathroom Rug


This hand-woven teak bathroom rug is another great addition to elevate your overall shower feel and aesthetics. Teak material is definitely the perfect rug choice simply for its moisture-resistant properties. It also requires much less maintenance compared to the standard bathroom accessories.

Teak Shower Bench with Storage

Teak Shower Bench with Storage

Stocking up shower supplies is quite a problem for some people, especially for small bathroom spaces. If you can relate to this, you’re definitely going to love this Teak Shower Bench with Storage. An efficient combination of a shower bench and storage underneath allows you to enjoy the best teak shower bench experience with multiple functions in just one bathroom accessory!

Teak Oil Finish

Last but certainly not least, an excellent old teak oil finish is just what you need to keep your teak wood shower accessories at their best and preserve that dep grain look without diminishing its natural oil properties. Applying some oil finish to your teak accessories at least once every six months will even prolong it’s lifespan and helps keep your wood in good condition.

Final Thoughts

With these excellent teak shower accessories, you may now sit back and enjoy your beautiful spa-like bathroom experience every single day. 

Did you find this helpful for you? Comment down below and we’d love to hear your thoughts on it.

Effective tools for a DIY enthusiast

Effective tools for a DIY enthusiast

tile, leveling, lippage, stone, marble, grout, ceramic, floor, flat, surfaces, granite, spacers, slab, stone, installation

Certain things are more comforting for a ‘Do It Yourself’ enthusiast than completing a home renovation project without any professional assistance. DIY lovers, although enthusiastic about completing a project all by themselves require proper tools and resources to effectively complete the job at hand. A trip to the local hardware store can get you access to a number of different tools and equipment; however, selecting the right ones can be a difficult job.

Bathroom renovation is one of the most complex DIY jobs since any complications in tiling or waterproofing can result in significant damage to the surrounding areas. It is for this reason that tools such as Pro Pan, ready to tile shower pans and Quick Kirb are widely used in a bathroom renovation job. Pro Pan and ready to tile shower pans come with a standard slope of 1/4” inch per foot, thereby ensuring a perfectly sloped shower floor. Further, Kirb perfect offers an easy solution to building a shower curb, thereby ensuring that water does not spill outside the shower area.

Tiling & grouting is another job that can create a problem for people who prefer to complete their home renovation job themselves without any professional help. Tiles have to be placed at an equal distance to smooth transitions. Further, the grouting job has to be completed in an effective manner so as to ensure proper sealing, and that the water does not seep through the grout. This job can be effectively completed by using tile spacers and grout caulk thinset. Further, DIY enthusiasts can also find a variety of tile trims that can add an appealing look to the tiling of a room.

tile, leveling, lippage, stone, marble, grout, ceramic, floor, flat, surfaces, granite, spacers, slab, stone, installation

One of the common problems faced by people while installing stone or ceramic tiles is that of lippage. This not only disrupts the aesthetics of the room but can also result in cracks in the tiled floor. This problem can be easily solved by using the revolutionary Tuscan leveling system. Using this system will ensure a perfectly level tiled floor and will also make the tiling job easy and convenient.

Be it a job for carpentry, landscaping, or plumbing, a number of DIY enthusiasts find it difficult to find that perfect level pitch. An effective slope level indicator can prove to be more than handy in measuring and correcting the slope level of a place. Such slope levels are ideal for use by roofers, contractors, carpenters, engineers and most importantly by ‘Do It Yourself’ enthusiasts.

Finally, safety is an issue that concerns most people before they embark on their DIY endeavor. Certain safety tools such as a face mask, gloves, knee pads and clean up bags are essential in order to successfully complete a home renovation project.

Therefore, it is prominent that there are a variety of choices of tools for a DIY enthusiast to select from in order to successfully complete a home improvement project. Proper tools and equipment will not only help in timely completion of a job but will also ensure that it is completed in an effective and proper manner.

Click Here to View Action Video

Copyright © 2010 FlooringSupplyShop.com

WarmUp Snow Melting Questions & Answers

WarmUp Snow Melting Questions & Answers

Warmup Snow Melting WSM

Q. How long does a snow melting system take to melt snow?

During typical Winter conditions, Warmup systems are designed to keep driveways and walkways clear of snow and ice with no waiting time.

To operate efficiently Warmup systems are designed to turn on before or at the first sign of precipitation below freezing. By anticipating a storm or sensing it quickly, Warmup systems are able to get slabs above freezing quickly to maintain constantly clear surfaces. With a warm slab, snow and ice quickly melt away without any waiting time.

Q. How far can you space snow melting cables?

If you are installing snow melting cable you may be wondering how far you can space the cable. Read more here about cable spacing.

Warmup recommends spacing snow melting cable at 3″ to deliver 50 watts per square foot. At 3″ spacing Warmup snow melting cable can deliver optimum results even under the harshest conditions.

Indoors or out, spacing heating cable further will decrease the heat output resulting in slower ramp-up times. Please refer to the chart below for a spacing guide.

CABLE SPACING COVERAGE
Cable length  (ft) Resistance (Ω) 3 pegs 4 pegs 5 pegs
84 WSM-240-1000 20 27 34
168 WSM-240-2000 43 57 72
209 WSM-240-2500 51 67 84
251 WSM-240-3000 62 84 104
330 WSM-240-4000 85 110 135
420 WSM-240-5000 100 140 170
500 WSM-240-6000 122 181 200

Q. Should I use snow melting mats or snow melting cables?

Warmup offers two forms of surface heating: snow melting mats and snow melting cables. The only difference between snow melting mats and snow melting cables is that snow melting mats have heating cable pre-fixed on a mesh for a quick installation in a regularly shaped space. While both options feature the same exact cable, installation instructions vary so it is important to read on to see what is best for your project.

For Regularly Shaped Spaces

Square or rectangle-shaped spaces would qualify as a regularly shaped. For these areas, Warmup recommends the use of snow melting mats. Snow melting mats have heating cable pre-fixed on a mesh for quick installation of 50 watts per square foot.

WSMM Warmup Snow Melting Mat

For Irregular Shaped Spaces

Stairs or curved spaces would qualify as irregularly shaped. For these areas, Warmup recommends the use of snow melting cables. Snow melting cable options are supplied on a spool so that cable can be custom-laid. To get the same heat-output as the snow melting mat, the cable must be spaced at 3″

WSMM Warmup Snow Melting Cable

Q. Are snow melting cables as effective as snow melting mats?

Warmup snow melting mats and snow melting cables are the exact same cable.  If snow melting cables are spaced the same as snow melting mats, (3″) they are as effective.

Warmup offers two forms of surface heating: snow melting mats and snow melting cables. The only difference between snow melting mats and snow melting cables is that snow melting mats have heating cable pre-fixed on a mesh for a quick installation in a regularly shaped space.

Installation of Snow Melting Cable under Concrete

Please refer to the Warmup Snow Melting Specifications and installation for more information regarding the installation of this product.

Q. Can I Still Install my Snow melt System with Expansion Joints in the Concrete?

Installing Snow melt System with Expansion Joints

Yes, however careful planning is necessary to avoid any issues when the expansion joints are cut.

To avoid any issues, plan out where the joints are cut.

Ensure one length of the cable is tied to the floating rebar. The cable should be tied to either side of where the joint will be. At the end, the cable loops, connecting both runs of cable. Use a landscape hook to secure the loop far enough down to avoid the joint cuts.WSMM-Warmup Snow Melting expansion joint

Make sure to be taking resistance readings before the cuts are made. Take readings during cuts are made and after to ensure there was no damage.

Warmup Snow Melting Specifications and installation

Click here to buy Warmup Snow Melting

Copyright © 2020 FlooringSupplyShop.com

Flooring Supply Shop Blog | Flooring and Floor Heating Supply - Part 5