PM-2B Rain, Snow and Ice Sensor Controller
By SunTouch® A division of Watts Water Technologies, Inc.
Installation Guide
| General Safety Instructions
1. THIS UNIT SHOULD BE INSTALLED, OPENED, AND REPAIRED BY QUALIFIED PERSONNEL ONLY! 2. To avoid shock hazard do not open the front cover with power connected to the PM-224 or any controlled equipment. 3. Limit input voltage to 22-28 VAC/VDC. 4. Replace fuse F1 with a 2 Amp 32 V or 250 V 3AG fast acting fuse ONLY. |
Selecting a Mounting Location for the PM-2B
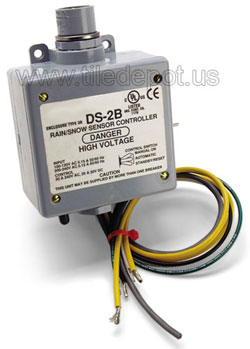
The interleaved grid on the top of the PM-2B is the precipitation sensor or “moisture grid.” The rubber “boot” protruding from the bottom of the enclosure is the temperature sensor. For reliable rain and snow detection the unit must be mounted in a location that exposes the moisture grid to a clear view of the sky. The unit should not be mounted directly under eaves or overhangs. It should not be mounted so close to the ground that it may become buried in snow. For proper temperature detection the PM-2B must be mounted outdoors, away from furnace vents, dryer vents, and other sources of heat. Note that, when powered, the PM-2B moisture grid will always remain hot. This is normal. This allows the grid to continuously melt snow and evaporate both rain and snow from the grid.
The PM-2B can be mounted by screwing the base conduit hub onto an appropriate size free-standing conduit or by using the mounting holes in each corner of the enclosure.
DO NOT DRILL HOLES THROUGH THE ENCLOSURE FOR MOUNTING!
This can allow water into the enclosure causing a potential shock or fire hazard. It is recommended that a weatherproof condulet or junction box be mounted below the PM-224 for termination of the power and load pigtails to the building wiring.
ALWAYS USE CARE WHEN REPLACING THE ENCLOSURE FRONT COVER!
Be sure the front cover gasket is not pinched or rolled. Do not overtighten the front cover screws
External Control/Monitor Operation
|
Pin
|
Color
|
Function
|
|
1
|
Green
|
Standby/Reset
|
|
2
|
Black
|
Manual On
|
|
3
|
Orange
|
Deice On Mon
|
|
4
|
Red
|
Deice On Mon
|
|
5
|
White
|
Return
|
An external control/monitor jack is provided on the PM-2B. Order the optional CS-1 control/monitor cable to access this feature. Connecting Black to White will activate the “Manual On” function. Connecting Green to White will activate the “Standby/Reset” function. The Red/Orange leads are connected to an internal low power monitor relay. This relay, rated at 24 VAC/VDC at 400 ma, will close with the load relay and can be used to externally monitor activation of the sensor.
Moisture Grid Maintenance & Replacement
It is recommended that the PM-2B be powered down and the grid wiped clean with clear water at least once every 4 months. Heavy deposits may be removed using Scotch-Brite. However, after a number of years, the corrosive elements left behind when water is evaporated out of the moisture grid will eventually damage the grid rings. The moisture grid can be easily replaced by ordering and installing an MG-1 “Moisture Grid Assembly” and following the procedure below:
THIS PROCEDURE SHOULD ONLY BE PERFORMED BY QUALIFIED PERSONNEL!
Open all power and load breakers connected to the PM-2B. Open the front cover and remove the cable from the Grid Jack. While holding the reducing bushing, unscrew and remove the old moisture grid. Install the supplied thread sealing tape, place the new grid into the top hole and screw the assembly into the reducing bushing. Tighten the grid hand tight plus ¼ turn. Reconnect the new cable to the Grid Jack.
Confirm that the four connector pins are properly aligned with the jack. Close the front cover, confirming that the front cover gasket is properly sealed. Reapply power.
ALWAYS USE CARE WHEN REPLACING THE ENCLOSURE FRONT COVER!
Be sure the front cover gasket is not pinched or rolled. Do not overtighten the front cover screws
Preseason Snow Detection Testing
It is always a good idea to test the operation of the PM-2B prior to the winter season. Procure some clean water and, if the outdoor temperature is above the trigger point, a can of spray component cooler (Radio Shack Part #64-4321 or equivalent.) Clean the moisture grid following the procedure outlined above and allow it to dry. Apply power to the PM-2B and drip some of the water onto the moisture grid, and then spray the temperature sensor protruding from the base of the enclosure with the component cooler. Once the temperature sensor has reached the trigger point with water still present on the grid the PM-2B will activate. The user should hear the internal control relay close. Proper operation has been confirmed. Allow the grid to dry completely. To clear the Delay-Off timer place the override switch into “Standby/Reset”, and then back to the “Automatic” position.
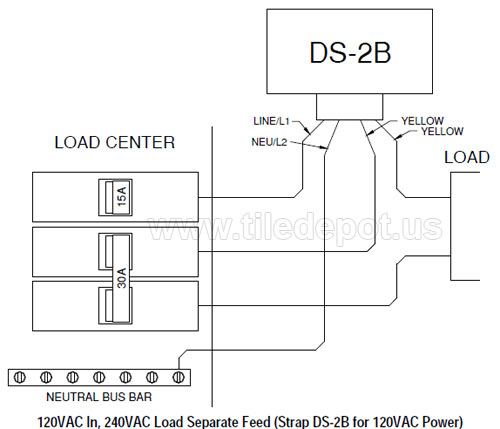
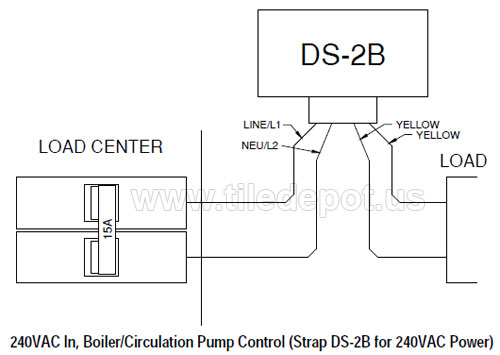
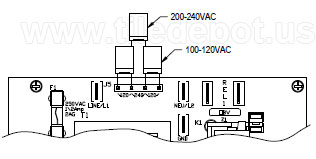
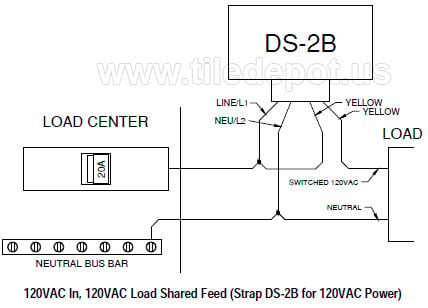
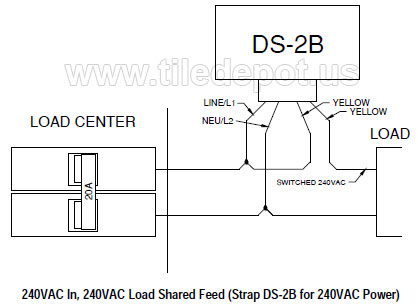
These are just some of the possible wiring schemes that can be used to connect the PM-2B to your load for control. The PM-2B should always be strapped for the voltage that is connected to Line/L1 and Neu/L2. Remember, these are only suggestions. You should always check with a qualified electrician to insure conformance with local electrical codes!
Voltage Selection, Power & Load Connection
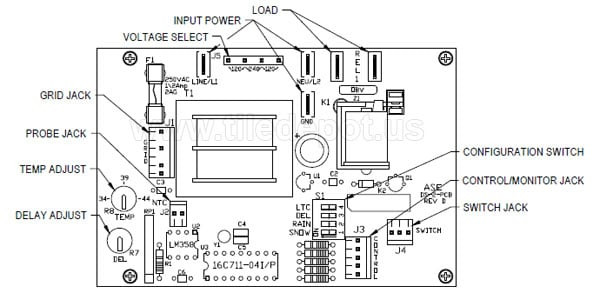
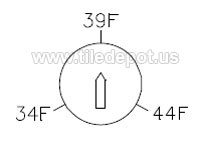
The following table outlines the operating modes for the PM-2B and explains the functions of the adjustments. Trigger temp (TT) is adjustable from 34°F-44°F using the “Temp Adjust” control. When ambient air temperature (AT) is below this trigger point precipitation is assumed to be snow. When above this temperature, precipitation is assumed to be rain. The SNOW switch will cause the sensor to activate when snow is detected. The RAIN switch will cause the sensor to activate when rain is detected. If RAIN and SNOW are both off the unit will operate as a low temperature thermostat.
Setting the Configuration Switches
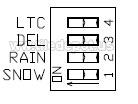
The following table outlines the operating modes for the PM-2B and explains the functions of the adjustments. Trigger temp (TT) is adjustable from 34°F-44°F using the “Temp Adjust” control. When ambient air temperature (AT) is below this trigger point precipitation is assumed to be snow. When above this temperature, precipitation is assumed to be rain. The SNOW switch will cause the sensor to activate when snow is detected. The RAIN switch will cause the sensor to activate when rain is detected. If RAIN and SNOW are both off the unit will operate as a low temperature thermostat.
 The DEL configuration switch activates the “Delay Off” drying cycle timer on the PM-2B. The timer allows the PM-2B to dry the heated surface through evaporation once precipitation has stopped. The drying cycle reduces the chance of moisture left behind refreezing into ice. This timer is restarted by each precipitation detection. Therefore, the PM-2B will continue to operate as long as precipitation is detected, then for the Delay Off period once precip has stopped. All “sensor” modes (DEL off) provide a minimum 2 minute closure to reduce cycling of an external controller. When in “controller” mode (DEL on) the Delay Off time can be adjusted from 30-90 minutes using the “Delay Adjust” control. Note the “Manual On” function at the low end of the Delay Adjust control. The relay will close when this area is entered and open when exited. Only use the “Manual On” function for testing. Never leave the Delay Adjust control near the “Manual On” area during normal oparation.
The Low Temperature Cutoff (LTC) option is typically used on snow melting systems with limited output capacity. If selected, the sensor will not trigger if precipitation is initially detected below 15°F. However, if the deicing system has been activated, precipitation continues, and the ambient temperature drops below 15°F, LTC will be ignored. This assures that water on the surface from melting snow will not immediately refreeze into ice as a result of deactivating the deicing system.
POWER MUST BE CYCLED FOR CONFIGURATION SWITCH CHANGES TO TAKE EFFECT
Specifications
| Function | Trigger | Delay | LTC | DEL | RAIN | SNOW |
| Snow sensor w\o LTC | TT>AT | 2 Min | OFF | OFF | OFF | ON |
| Snow sensor w\LTC | TT>AT>15°F | 2 Min | ON | OFF | OFF | ON |
| Snow controller w\o LTC | TT>AT | 30-90 Min | OFF | ON | OFF | ON |
| Snow controller w\LTC | TT>AT>15°F | 30-90 Min | ON | ON | OFF | ON |
| Precipitation sensor | Not Used | 2 Min | X | OFF | ON | ON |
| Precipitation controller | Not Used | 30-90 Min | X | ON | ON | ON |
| Rain sensor | AT>TT | 2 Min | X | OFF | ON | OFF |
| Rain controller | AT>TT | 30-90 Min | X | ON | ON | OFF |
| LT thermostat w\o LTC | AT>TT | 2 Min | OFF | X | OFF | OFF |
| LT thermostat w\LTC | TT>AT>15°F | 2 Min | ON | X | OFF | OFF |
| Function | Ambient Temp (AT) | Delay Off | Suggested Application |
| Snow sensor w\o LTC | AT < TT | 2 Min | Snow and ice alert, Sensor for external deice/snow melt controller (unlimited heat) |
| Snow sensor w\LTC | AT < TT & AT > 15oF | 2 Min | Sensor for external deice/snow melt controller (limited heat) |
| Snow controller w\o LTC | AT < TT | 30-90 Min | Stand-alone controller for satellite antenna/tower deicing and electric/hydronic snow melting |
| Snow controller w\LTC | AT < TT & AT > 15oF | 30-90 Min | Stand-alone controller for satellite antenna/tower deicing and electric/hydronic snow melting |
| Precipitation sensor | Not Used | 2 Min | Snow, ice, and rain alert, Ku band rain and snow diversion |
| Precipitation controller | Not Used | 30-90 Min | Snow, ice, and rain alert, Ku band rain and snow diversion |
| Rain sensor | AT>TT | 2 Min | Rain alert, Ku band rain diversion |
| Rain controller | AT>TT | 30-90 Min | Ku band rain diversion |
| LT Thermostat w\o LTC | AT < TT | 2 Min | Low temperature intelligent thermostat |
| LT Thermostat w\LTC | AT < TT & AT > 15oF | 2 Min | Low temperature intelligent thermostat (limited heat) |
Fine Adjustment for Efficient Operation
The PM-2B is shipped with the TEMP and DEL adjustments in the center position, representing 39°F (3.9°C) and 30 minutes of Delay-Off time respectively. Depending on local conditions the user may find that fine adjustment of the controls may provide more satisfactory operation. If the sensor does not trigger during very wet snows the trigger temperature may need to be adjusted higher. Conversely, if the user notices false triggers during cold rains that do not freeze, the trigger temperature may need to be lowered. The Delay-Off time can also be adjusted to provide clean melt-off without excessive running time. Fine adjustment can both save operating expense and provide more reliable operation. However, to keep reliability high, always make adjustments in small increments.
ALWAYS USE CARE WHEN REPLACING THE ENCLOSURE FRONT COVER!
Be sure the front cover gasket is not pinched or rolled. Do not overtighten the front cover screws.
Manual Override Switch Operation
An override switch mounted on the side is provided for testing and special operational requirements. Placing the switch in the “Automatic” position will allow the sensor to operate normally, activating the controlled equipment as needed. Placing the switch in “Manual On” will close the load relay, activating the controlled equipment. The “Standby/Reset” position prohibits triggering of the unit, clears any active delay timer, and opens the load relay. In order to reduce excessive runtime for the heater the “Manual On” mode will remain in effect for a maximum of 40 hours, then return to “Automatic” mode even if the switch is still in the “Manual On” position. You may put the DS-2B back into “Manual On” mode by switching to “Automatic”, then back to “Manual On”. This will restart the 40 hour timer.
If the override switch is placed in “Manual On” for less than 2 seconds, then switched back to “Automatic” the controller will execute one delay off cycle.
This can be used to clear a frost or hail buildup without the danger of leaving the system in a continuous “Manual On” condition. “Standby/Reset” can still be used to clear this delay off cycle.
Typical Wiring
The sensor supply voltage can be in the range of 22-28 VAC/VDC. The supply input leads (IN A and IN B) are not polarity sensitive and can be connected to either polarity of a DC supply. A standard 24VAC 20VA HVAC-type transformer will supply enough power for the PM-2B and an optional PM-DP indoor control/display panel.
The two load leads of the PM-2B do not supply power directly to your load. The relay inside the PM-2B, like a switch or thermostat, is used to switch a voltage of your choice. While not as convenient as directly supplying power for the load this allows you to operate the PM-2B from one voltage while controlling a load of a different voltage without adding an external relay or contactor. For example, the PM-2B can be powered from 24VAC but can directly control a 12VDC signal for a contactor coil or can operate from 24VAC and provide a dry contact thermostat-style closure for a boiler. The following diagrams show some possible wiring schemes for connecting the PM-2B to your load. For clarity the GROUND lead is not shown.
24VAC/VDC Sensor Supply, Supply Voltage Out
24VAC/VDC Sensor Supply, Dry Contact Thermostat-Style Control
|
PM-2B Specifications
|
|
Dimensions
|
4¾”(120) x 7″(178) x 2¾”(70)
|
|
Weight
|
2 Lbs. (0.9 Kg)
|
|
Operating Temperature
|
-40oF to +185oF (-40oC to +85oC)
|
|
Enclosure Rating
|
NEMA 3R
|
|
Supply Power
|
100-120VAC/200-240VAC Field Selectable 15W maximum
|
|
Trigger Temperature
|
34oF-44oF (1.1oC-6.6oC) Field Selectable
|
|
Delay Off (Sensor)
|
2 Minutes
|
|
Delay Off (Controller)
|
30-90 Minutes Field Selectable
|
|
Load Contact Capacity
|
30A @ 240 VAC/100,000 operations minimum at full load
|
|
Monitor Contact Capacity
|
24 VDC/VAC 400mA 10W total
|
Automatic Activation means Lower Deicing Costs
Reliable Rain and Snow Detection
Full 30A @ 240VAC Control
Field Strap for 100-120/200-240 VAC Operation
Replaceable Precipitation Sensor
Easy Installation, Full Access to Electronics
8 Different Functions, 1 Part Number
Adjustable Temperature Trigger Point
Adjustable Delay Off Cycle
Selectable Low Temperature Cutoff
Smart “Manual On” Operates for One Delay Off Cycle
High Power, Low Price!
I am ultimately thankful to you for providing us with this invaluable material. My spouse and I are in truth grateful, only the computer data we needed.
Hey that was indeed a remarkable article. I want to thank you for writing it. I will definitely check back.