Satisfaction guaranteed. Call us anytime at 323-731-8453.
stone solution sealers | Flooring Supply Shop Blog

Maintain Concrete Pavers and Brick

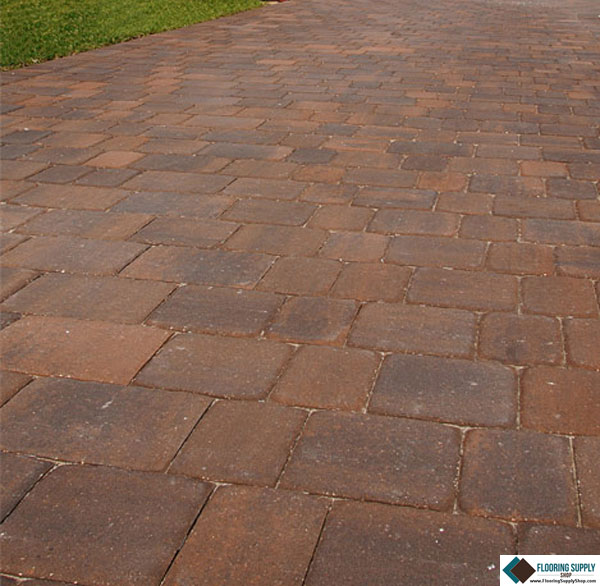
How To Seal & Maintain Concrete Interlocking Pavers & Brick

glaze n seal, Pavers sealers, Brick sealers, sure seal Sealant, stone solution sealers, tile and grout sealers, Stone Color Enhancer, Stone Sealant Impregnator

Buy Now

The following information is based on product application reports and manufactures information and is provided in good faith to assist the consumer. READ ALL INSTRUCTIONS AND PRODUCT LABELS COMPLETELY BEFORE USING. PRE-TEST IN AN INCONSPICUOUS AREA PRIOR TO APPLICATION TO DETERMINE IF THE DESIRED RESULTS ARE ACHIEVED.

Unsealed interlocking pavers & brick are subject to staining, fading, sand loss, and can sometimes develop weeds and mildew growth. With proper sealing and maintenance your pavers will be more likely to have a long lasting, beautiful and durable life and appearance. The sealer selection for Interlocking Pavers, brick and other types of sand set pavement material is generally based on the desired “finished” look and the degree of stain resistance required as well as the need for joint sand stabilization. Most paver installations will benefit from a sealer that has joint sand stabilizing properties. Use of Glaze ‘N Seal’s Paver Sealer & Joint Stabilizer will protect from stains, oil and fading as well as sand erosion.

Recommended Product Stain Resistance Finished Look Comment
Paver Sealer/Stabilizer Excellent Low-Medium Sheen Water-based – Film-forming

Surface Preparation

Newly manufactured concrete pavers should cure 14 days or more before sealing. Follow paver manufacturer’s recommendations. Prior to the application of Glaze ‘N Seal’s sealer products, surface must be thoroughly clean. Remove all dirt, oil, grease, paint, efflorescence and any previous sealers that may not be compatible with the new sealer. General cleaning may be done using Glaze ‘N Seal’s alkaline base Heavy Duty Cleaner. Mix the concentrated detergent according to label instruction depending on severity of surface soils. For Efflorescence stains or hard water deposits, use Glaze ‘N Seal’s mild acidic cleaner Efflorescence Remover. Note…(When acid has been used for any reason, surface must be neutralized). For neutralizing, we recommend Glaze ‘N Seal’s Neutralizing Rinse. Always read cleaning product instructions and cautions with any cleaner.

After tamping down joint sand and sweeping the sanded areas for new installations, be sure the sand is at least 1/8 inch below the surface of the pavers. Make sure all sand residue and fine powder is removed with broom & blower before application of any film forming sealers. Allow any moisture in or on the surface of the pavers to dry at least 24 hours. Allow 48 hours or more if temperatures are cool or a pressure washer has been used. For best results the sand should be dry to its full depth before sealing. It is always recommended to test the sealer of choice in a small area first. Always read product label and directions carefully before beginning to use any sealer products.

Seal

  • Apply Glaze ‘N Seal’s Paver Sealer & Joint Stabilizer to a clean dry surface using a compressed air hand pump garden-type sprayer. Apply a heavy saturating coat of sealer. Ensure that all joints are flooded to maximize sealer soaking into the dry sand. Immediately squeegee any excess product down into the sand joints using a large foam or rubber squeegee. Avoid puddling on the surface. An optional second thin coat may be applied to the surface of the pavers after two hours if desired to increase protection & gloss. Ideal surface temperatures should be above 55° and below 85°.
  • After final coat, allow sealer to dry 2 hrs before foot traffic. Limit heavy traffic. Keep vehicular traffic and moisture off for 72 hours while sealer cure

Maintenance & Other Sealer Options For Concrete Interlocking Pavers & Brick

Seal

  • Maintain your pavers with periodic cleaning of grease, dirt, loose soil and hard-water stains with Glaze N Seal’s (Heavy Duty Cleaner). For stubborn grease spots use Heavy Duty Cleaner in a more concentrated formulation. Rinse surface well with water.
  • Reapply maintenance coats of sealer as needed. All Glaze N Seal sealers are re-coatable. Make sure surface is clean and dry at time of reapplication.

If Considering Other Glaze ‘N Seal Sealers For Concrete Interlocking Pavers & Brick, See Options Recommended From Chart Below

Finished Look Stain Resistance Recommended Product Comment
“Wet Look” Excellent-S, O, W “Wet Look Lacquer” Solvent-based – Film-forming
Low-Medium Sheen Excellent-S, O, W Multi-Purpose Sealer* Solvent-based – Film-forming
“Natural Look” Excellent-S, O, W Stone Sealant Impregnator Water-based – Penetrating
“Natural Look” Excellent-W Natural Look Penetrating Sealer* Water-based – Penetrating

Stain Resistance: Stain (S ) Oil (O) Water (W)

*Economical water repellant. If a natural look with oil resistance is needed, use Stone Sealant Impregnator.

  • If a deeper wet look appearance is desired, Glaze ‘N Seal’s “Wet Look” Lacquer can be applied to an unsealed surface, When applying film-forming sealers as “Wet Look” Lacquer or Multi Purpose sealer, use 2-3 thin even coats. Minimize foaming. A solvent resistant spray applicator is recommend when applying “Wet Look” Lacquer“.
  • Glaze N Seal’s Natural Look Penetrating Sealer may be used to provide a long lasting water protection that looks natural on the paver surface. Glaze ’N Seal’s Stone Sealant Impregnator will provide premium stain, oil and water protection that looks natural on the surface. When using penetrating-type sealers Stone Sealant Impregnator or Natural Look Penetrating Sealer, apply one liberal coat using a sprayer or roller. Do not allow excess Natural Look Penetrating Sealer to dry on the surface. Wipe up excess sealer before it dries. After 10-24 hrs check repellent by dropping water droplets on surface to check for water bead. If need apply second coat.

More information on how to clean Seal and maintenance your hard surface

How to Seal and Maintain Concrete Counter Tops

How to Seal and Maintain Concrete Counter Tops

Miracle Sealants, sure seal Sealant, stone solution sealers, Glaze n Seal, Slip Grip, tile and grout sealers, Stone Color Enhancer, Stone Sealant Impregnator, Grout Sealer

Buy Now

Recommended Sealers for Use on Concrete Counters

The following Glaze ‘N Seal sealers are popular choices for use on concrete counters. They will resist water stains, oil stains and enhance appearance. They are durable and re-coatable. Always perform a test patch, allow it to dry thoroughly and “test” likely contaminates.

Wet Look Lacquer

  • A clear coating sealer (solvent base)
  • Non-Yellowing
  • Will not turn white
  • Excellent oil resistance
  • Resists acids
  • Resists efflorescence (white residue)
  • Imparts “wet look” appearance
  • Additional coats add gloss
  • Safe for food surfaces (after fully curing)
  • Re-coatable
  • Leaves a coating on top of surface

Multi-Purpose Sealer

  • A clear coating sealer (water base)
  • Leaves a coating on top of surface
  • Non-Yellowing
  • Resists acids
  • Excellent oil resistance
  • Safe for food surfaces (after fully curing)
  • Re-coatable
  • May be applied over Wet Look Lacquer
  • Medium to high sheen (based on number of coats)

Stone Sealant Impregnator

  • A below surface penetrating sealer (water base)
  • Leaves no film or coating on top
  • Natural look appearance
  • Safe for all food surfaces
  • Excellent oil resistance
  • NOT acid resistant
  • May be re-applied if needed
  • Not recommended over coating-type sealer

New concrete counters should cure at least seven (7) days or more before sealing. Read package label carefully and perform a small test-patch before sealing entire surface. Concrete surface must be clean, dry and free of any contaminants including old wax and failing sealers. Wax or polish should be stripped with a quality item such as Glaze ‘N Seal Stone Stripper or Heavy Duty Cleaner. Old coating-type sealers (if peeling or damaged) should be removed with a quality item such as Glaze ‘N Seal Paint, Sealer and Coating Stripper.

Estimated coverage per gallon for the first coat – 150 to 200 square feet. Additional coats will add fifty-percent more coverage.

Coating-type sealers will build protection and gloss with multiple, thin and even coats. Use a lambs-wool applicator, brush or paint pad. Apply additional coats until the last coat does not darken the appearance.

Penetrating-type sealers will not add gloss but will protect. Apply two liberal coats with a brush or paint pad. Generally, additional coats will not affect appearance, but may leave a residue if over applied.

Routine Maintenance

Even AFTER sealing, the concrete counters are not indestructible.

Use coasters for glasses and hot pads for hot items. Minor scratches should be removed with non-abrasive “Scotch Brite” pad.

Do not place hot pans and dishes (above 300°) on sealed surface.

Stain resistance to water-based spills, oils, food items, etc., is excellent; however, spills should be removed as soon as possible.

Coating-type sealers will be etch-resistant to acidic items such as colas, citrus juices and wine because of the film barrier. Penetrating sealers do not protect against etching.

Clean the sealed surface regularly with a soft cloth using diluted Glaze ‘N Seal Neutral Cleaner or Stone Cleaner. Rinse with a minimum of water and dry promptly. Soaps and detergents can leave a film on the surface. NEVER use abrasive cleaners, bleach or ammonia.

The use of Glaze ‘N Seal’s Acrylic Floor Polish or a quality paste Carnauba food safe wax is optional as a sacrificial maintenance top coat…. Not a silicone type product.

Reapply polish as needed (remove any old polish or wax first) before reapplying sealer.

Note: Always test a small area of surface to be sealed to verify penetration and satisfaction of sealed appearance.

More information on how to clean Seal and maintenance your hard surface

Why to use a colored grout sealer

colored grout sealer, glaze n seal, sure seal, stone solution sealers, sealers, cleaners, green products, stone sealers, grout sealers, tile & grout sealers, eco-friendly sealers

One of the most essential aspects of a tiling job is grouting the empty spaces between two tiles. Grouting would keep the tiled floor bonded together for a long duration of time. Grout between two tiles also prevents them from rubbing against each other and cracking. Although effective, grout is a porous substance that can easily absorb moisture and any liquid that is spilled on the floor. It is for this reason that the process of sealing the grout becomes highly essential.

Grout is generally available in two forms: sanded and un-sanded. The use of sanded or un-sanded grout would depend on the tile material as well as the size of tile joints. Irrespective of the type of grout being used, applying a layer of grout sealer is important for high durability of the floor.

A grout sealer prevents the percolation of moisture into the grout, thereby preventing problems such as mildew and mold. Along with this benefit, a grout sealer would also prevent discoloration and staining of the grouted area. Any liquid that is dropped on the tiled floor would stay on top of the grout due to the applied sealer. This would give you more time to clean the liquid before the grout absorbs it, thereby preventing staining.

colored grout sealer, glaze n seal, sure seal, stone solution sealers, sealers, cleaners, green products, stone sealers, grout sealers, tile & grout sealers, eco-friendly sealers

Grout sealer is available in two variants: clear sealer and color sealer. Application of a clear grout sealer would not alter the color of the grout and would ensure that the grout retains its natural color. On the other hand, a color grout matches with the color and design of the tiles, thereby allowing for a uniform look to the tiled floor.

A colored grout is either used to match with the tile composition or allow for a contrast in the look of the floor. Colored grout can even be used in case the earlier grouting has stained due to some reason. A colored grout sealer is generally available in a wide range of colors, thereby allowing you to easily select one as per your specific requirements.

Along with enhancing the visuals of your tiled floor, color grout offers a number of other advantages as well. Color grout is generally odorless, thereby creating a clean environment in the room. These sealers reduce the ongoing maintenance expenses significantly and enable the use of natural cleaners.

colored grout sealer, glaze n seal, sure seal, stone solution sealers, sealers, cleaners, green products, stone sealers, grout sealers, tile & grout sealers, eco-friendly sealers

You can apply color grout in two ways; by the “brush-on method” or the “spray-on method”. In the brush-on method the sealer is applied directly to the grout using a brush. In a spray-on method, the sealer is sprayed over the entire floor. The sealer over the grout gets absorbed while the sealer over the tiles gets evaporated.

The method used by you to seal the grout would depend on various factors such as your budget and type of sealing material. Due to its numerous advantages, the “color grout sealer” is being widely used by homeowners. Not only does a color sealer enable you to change the visuals of the floor as per your requirements, it enhances the durability of the floor as well.

Copyright © 2010 FlooringSupplyShop.com

Furniture Cleaning with Natural Products

Cleaning products, environmentally friendly, stone solution sealers, ecostone, Earth-friendly Products,

Cleaning your furniture with natural products is not only good for your furniture, but it also great for the family as well. This is because there are no harmful chemicals within the natural remedies. You will be able to get the maximum clean without having to use a large amount of chemicals in order to so. You will be able to remove stains and odors in no time when you use the natural solutions which is great when you want a clean look to your furniture rather than a rundown dingy look. This also helps with the odors that might be on the furniture.

Some of the remedies that are both natural and more than likely successful are vinegar, soapy water, and even a mild laundry detergent. These are all great solutions, and this is great since it removes the dirt and debris, as well as removes all of the stains and odors within the furniture. You can get everything you need from the solution that you put together. If you choose to use laundry detergent then make sure there is no bleach within the mixture. It can cause stains on your furniture that you will not be able to remove. Be creative, and think of new solutions to mix together.

There are so many natural products that you can use on the floors in your home. You just have to find out which ones work best for the type of flooring that you have, and which ones would be beneficial for you to use when the time comes depending on what you’re cleaning off the floors. This is something that should be done no matter what you have going on. The health of your flooring is important and should be upheld throughout the years to save you money without having to purchase new flooring each year.

Cleaning products, environmentally friendly, stone solution sealers, ecostone, Earth-friendly Products,

You can use a number of solutions that are natural and will not ruin the floors. This includes lemon juice, baking soda or powder, vinegar, water, and of course mild soaps but they are not as natural as all of the rest of the choices. Depending on the stains and smells that need to be lifted, some might be better than others. This is something that is beneficial when the time comes to clean your floors without ruining the carpets or linoleum. You can choose to go with a number of options, the one you choose all depends on what you want when it comes to cleaning your carpets.

There are many reasons why you might need to call for help, and whether which one comes about it might be time to call a professional who can help with everything you need. Try not to go too far to ruin your furniture or floors. When it doubt, call someone who is familiar and knows what to do in these certain situations. For more information, you can visit www.flooringSupplyShop.com. They will provide you with all the floor, carpet, tile, and wood natural floor solutions to get your floors looking at their best without all the harmful chemicals.

Cleaning products, environmentally friendly, stone solution sealers, ecostone, Earth-friendly Products,

Copyright © 2010 FlooringSupplyShop.com

Effectively clean your floor tiles

Tile Flooring

A tiled floor looks appealing and pleasing as long as it remains free from dust, stains and other impurities. However, maintaining that shiny and appealing look of a tiled floor can be a daunting and time consuming task. Not just the tiles, but the grout can get dirty and discolored as well thereby giving the whole tiled area an untidy look.

Dry mopping the tiles is important; however, care should be taken while dry mopping since the dust particles can scratch the tiles. Further, if proper care is not taken this process generally does not clean the grout area, thereby leaving the tiled area unclean. It is therefore a good idea to use vacuum cleaner, a dust mop or a rubber prong broom. After dry mopping the tiles it is important to use a damp mop to bring back the original shine to the tiles. Although damp mopping by simply using warm water is effective, it might not be enough to remove tough stains from the tiles.

ceramic bathroom tiles, stainless steel tiles, mosaic tiles, Glass Tile, Metal Tile, Tile Trims, Ceramic tile, Shower Tile, Flooring Tile, Los Angeles Tile, stone, Porcelain, marble, Granite, install tile, Counter top tile, Bathroom Tile

In order to remove tough stains, such as those caused by grease, you should use an oxygen bleach based cleaning solution. However, such an oxygen bleach based cleaning solution should not be used on colored grout since the grout can get discolored due to the bleach. In case you are apprehensive about using bleach on the tiles and the grout you can clean them using a mixture of vinegar and warm water.

Cleaning the tiles is a relatively easier task as compared to cleaning the grout area. Problems with the grout generally vary depending on the different areas of a house. For example, the grouting problems associated with the shower area include the growth of mold and mildew; whereas the grouting problems in the kitchen include discoloration and food stains. In severe cases of mold and mildew growth, the only option left is to re-grout; however, stains can effectively be treated using a common bleaching agent.

Cleaning products, environmentally friendly, stone solution sealers, ecostone, Earth-friendly Products

Irrespective of the severity of the stains, it is essential to start using mild cleaning agents. In case they do not work you should work your way up to harsher chemicals to remove the stains. Some mild cleaning solutions can be made at your home easily by mixing warm water with vinegar or baking soda. In case such a solution does not work you can use a commercial grout cleaning solution or other strong products such as oxygen bleach & chlorine bleach.

While cleaning your tiled area and the surrounding grouted area there are a few considerations that you should keep in mind. You should avoid using abrasive materials such as steel wool to ensure that the tiles do not get scratched. Further, you should also refrain from using excessive force while cleaning to avoid chipping or cracking of the tiles. Finally, the most effective way of ensuring that your tiles and grout do not get stained is to mop up the spill immediately. Proper care and maintenance will ensure that your tiled floor keep looking like new for a long duration of time.

Cleaning products, environmentally friendly, stone solution sealers, ecostone, Earth-friendly Products

Copyright © 2010 FlooringSupplyShop.com

stone solution sealers | Flooring Supply Shop Blog